With these life hacks, you no longer need to call a plumber
30 Jun 2023Probably, everyone in life faced the problem of clogging in the sink, rusting on knives or peeling paint on windows. These problems always freeze unexpectedly and bring with them a number of inconveniences. Therefore, to be ready to solve any problem in everyday life - you no longer need to call a plumber, just read our article and remember these simple life hacks.
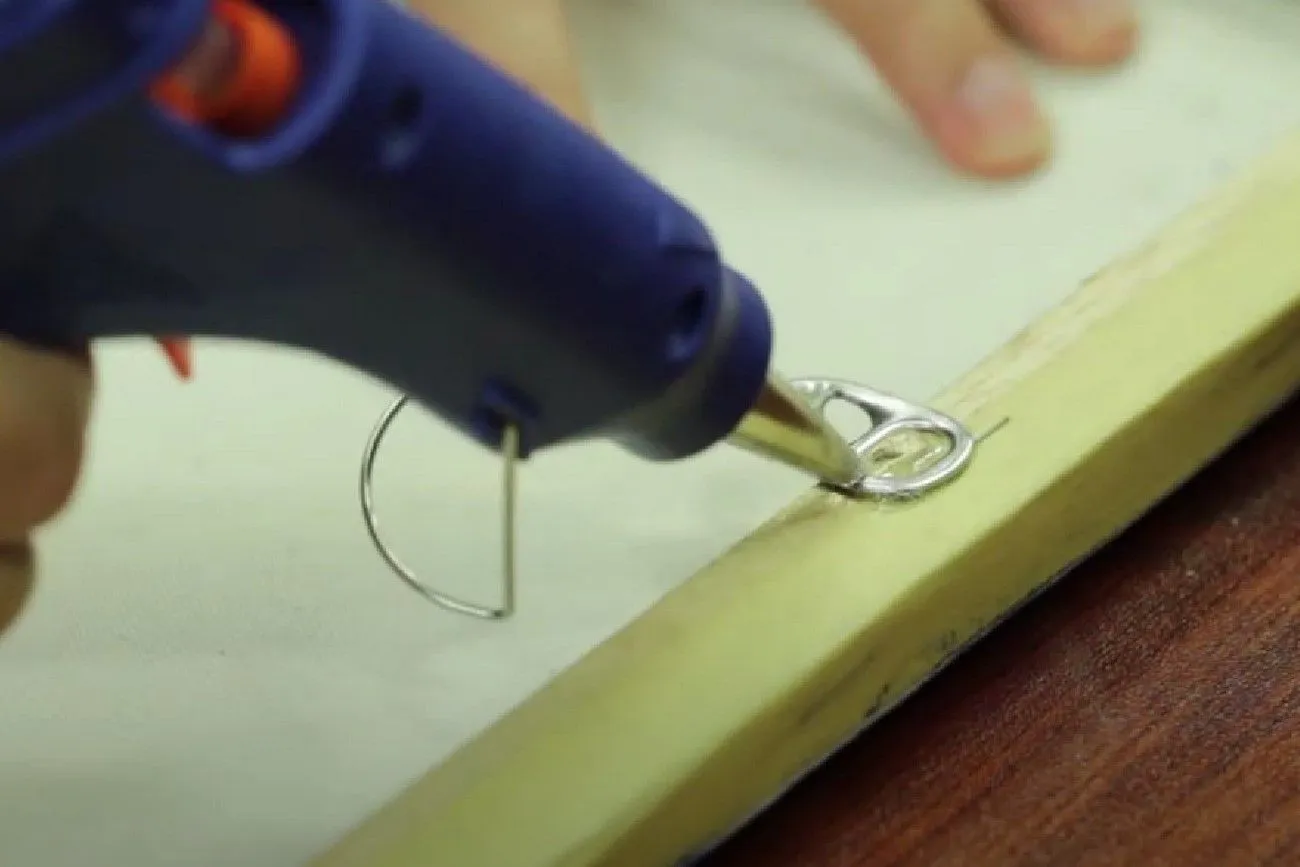
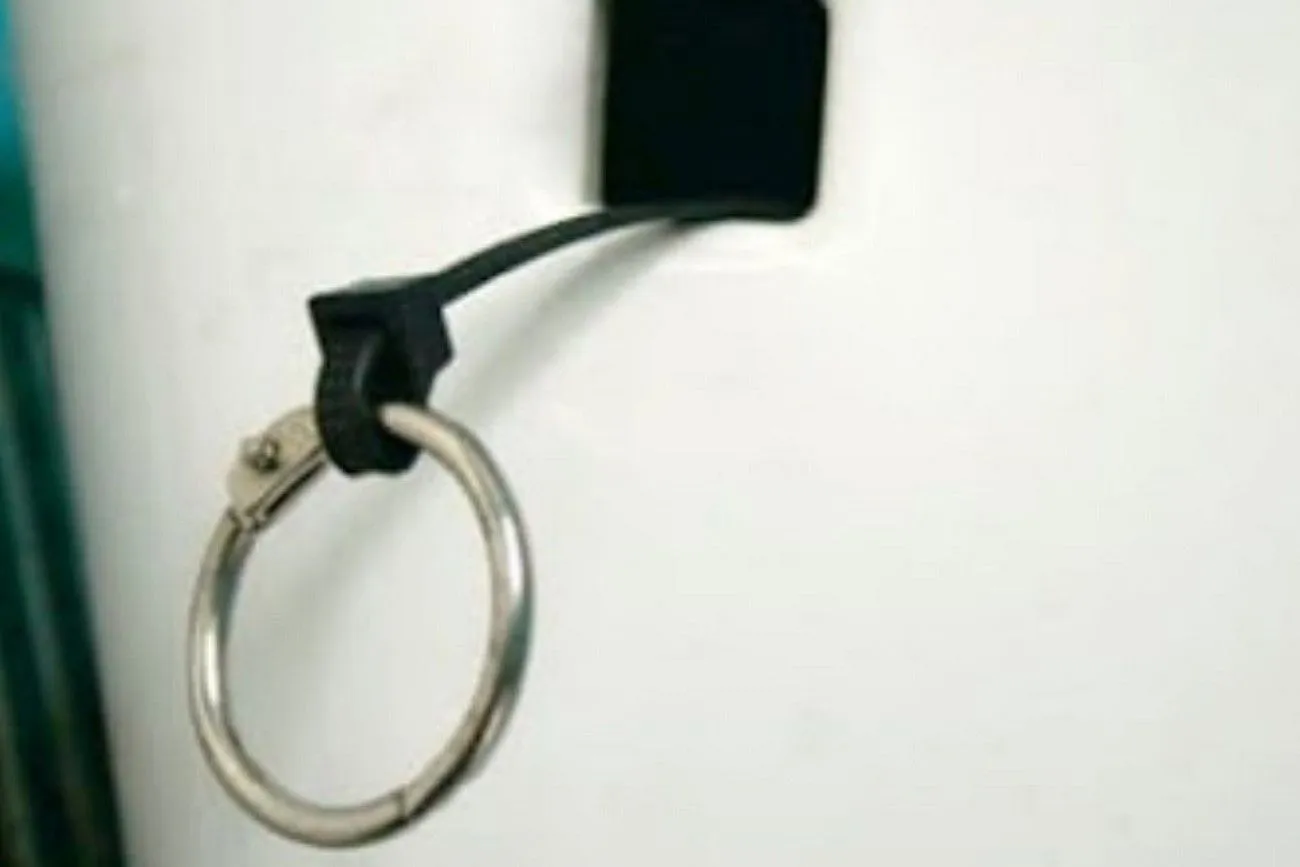
Soda Tabs as Picture Hooks
Soda can tabs have various practical uses, and in this case, they can be repurposed to hang picture frames effortlessly. Begin by drilling a screw into the bottom portion of the tab, and then utilize the top half to attach it to a hook or nail on the wall. This simple DIY method allows you to easily hang and display your picture frames without the need for additional hardware.
 @How To Use Aluminium Can Tabs As A Picture Hanger DIY/How To/YouTube.com
Broken Toilet Handle
To fix a broken toilet handle, you'll need zip ties and a circular item such as tape or a binder clip. Start by running the zip ties through the handle hole and attach them to the flapper. Then, pass the other end of the zip ties through the circular item. Finally, run the zip ties back through the handle hole, securing them tightly. This setup will allow you to pull the flapper open when needed, effectively replacing the function of the broken handle.
 @Zip Ties for Screws #shorts/Tool_Tips /YouTube.com
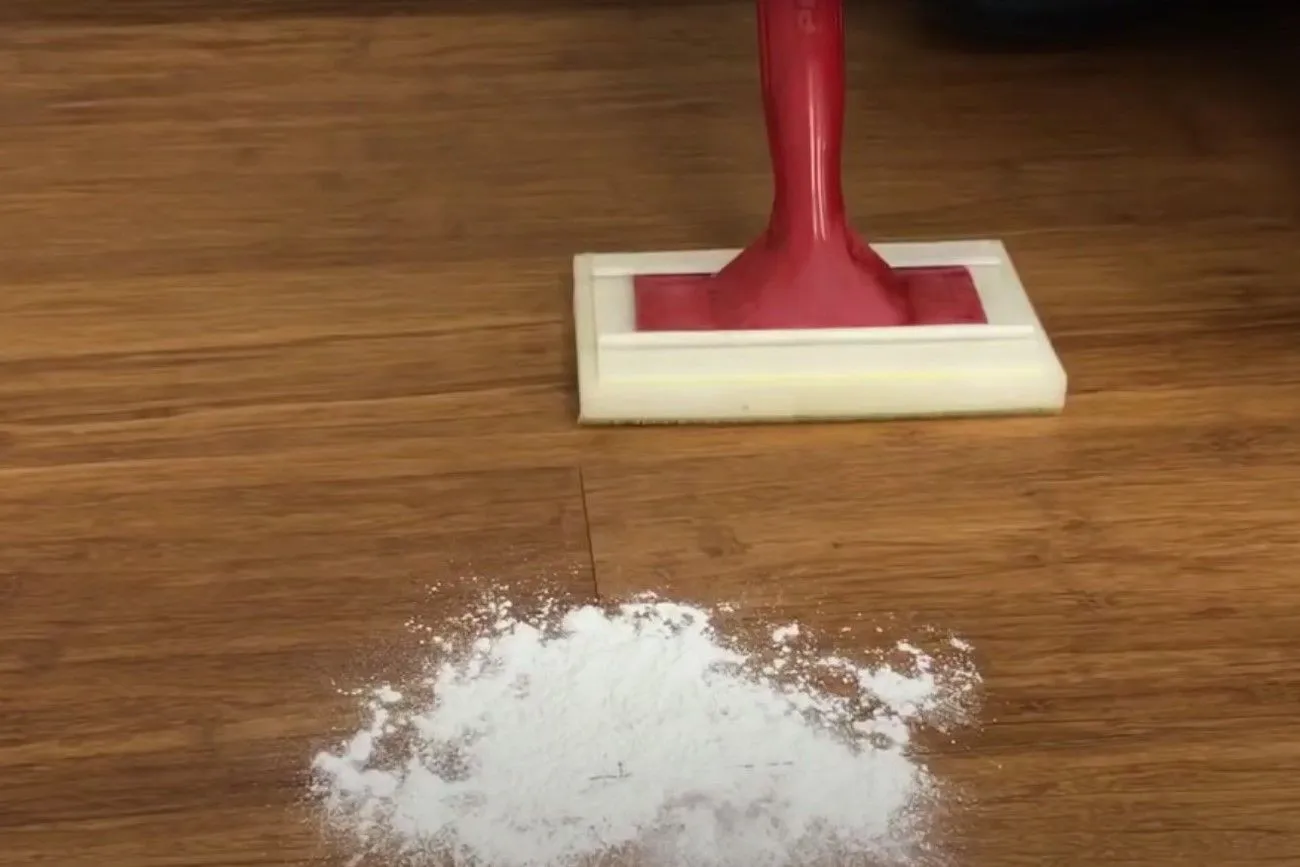
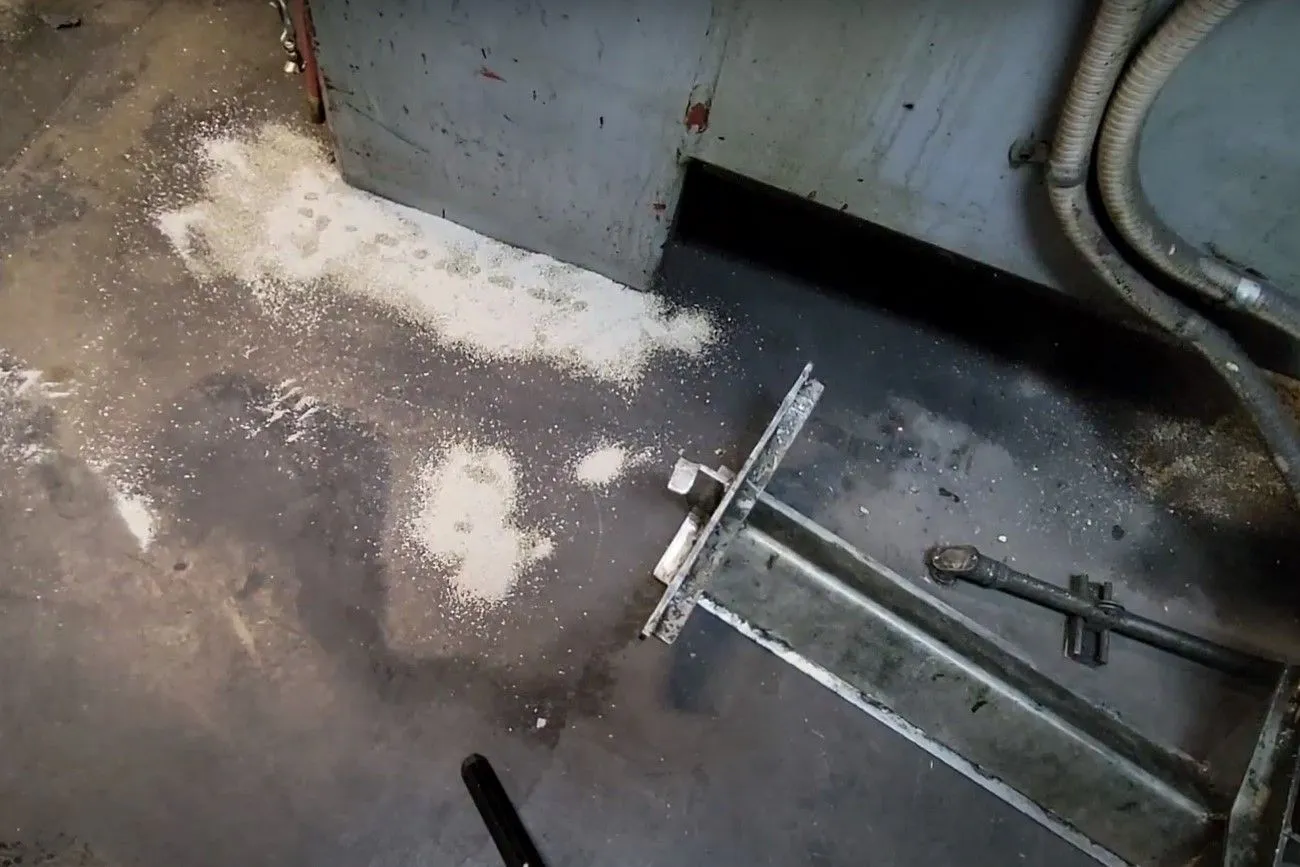
Stop Creaky Floor
A peculiar yet effective way to address squeaky floorboards is by sprinkling a layer of talcum powder over them. This simple solution can save you the hassle and cost of hiring a repair person. It's not limited to floor alone; any creaky floorboard in your home can benefit from this technique, ensuring peaceful movements without disturbing your downstairs neighbors. Remember to rub the talcum powder into the floorboards for optimal results.
 @How to Stop Wood Floor Squeaks With Powder/RW Supply+Design/YouTube.com
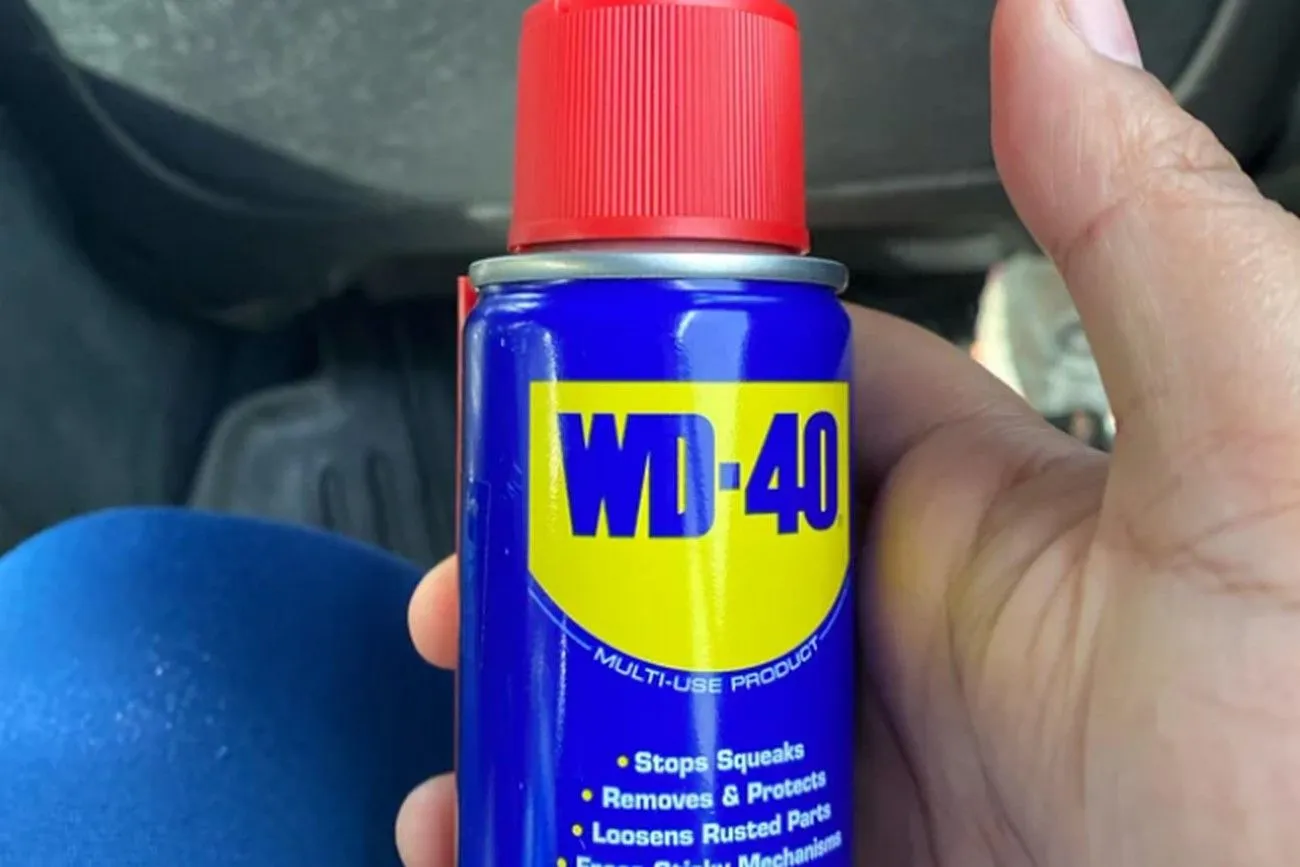
Removing Ice from Windshield
During the winter months, one of the additional tasks in our morning routine is clearing snow or ice from our windshields. This can be particularly frustrating when we're already running late. However, if you find yourself without de-icer spray, there's a handy alternative you might have readily available: WD-40. Before going to bed, simply spray some WD-40 on your windows and windshield. Then, use a clean, dry cloth to evenly spread the WD-40 across the surface. This creates a barrier that helps prevent snow and ice from sticking to your windows overnight.
 @ByePolar00/reddit.com
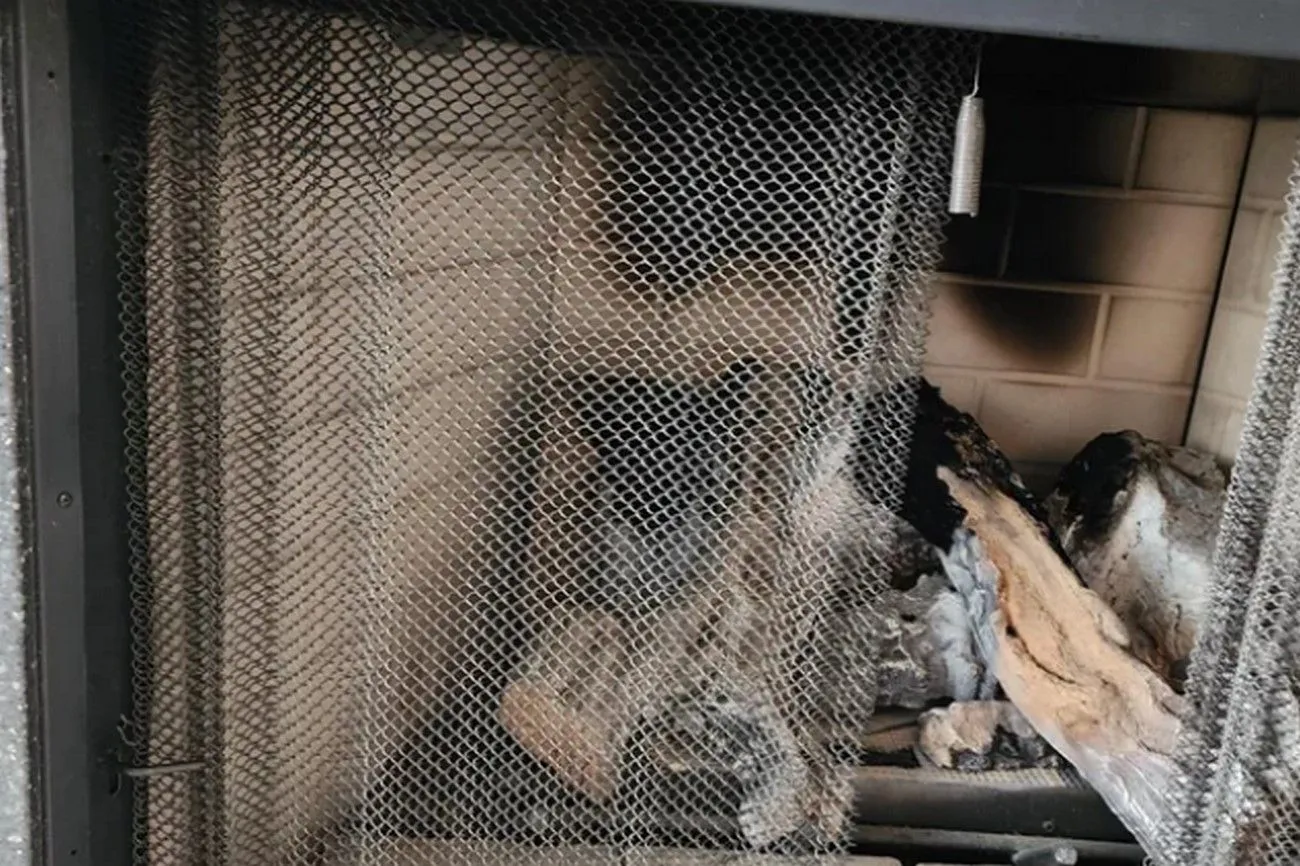
Stuck Fireplace Damper
The damper is a crucial component of a fireplace, as it helps control the airflow and prevent drafts. It is essential to keep the damper clean to ensure its proper functioning and prevent potential hazards. If you notice that the damper is sticking, it's important to address the issue. Begin by using a sturdy wire brush to scrape away any debris or soot that may have accumulated on the damper. Once the surface is free from build-up, apply a light coating of WD40 to the damper to lubricate it and facilitate smoother operation.
 @NeuralFoil252/reddit.com
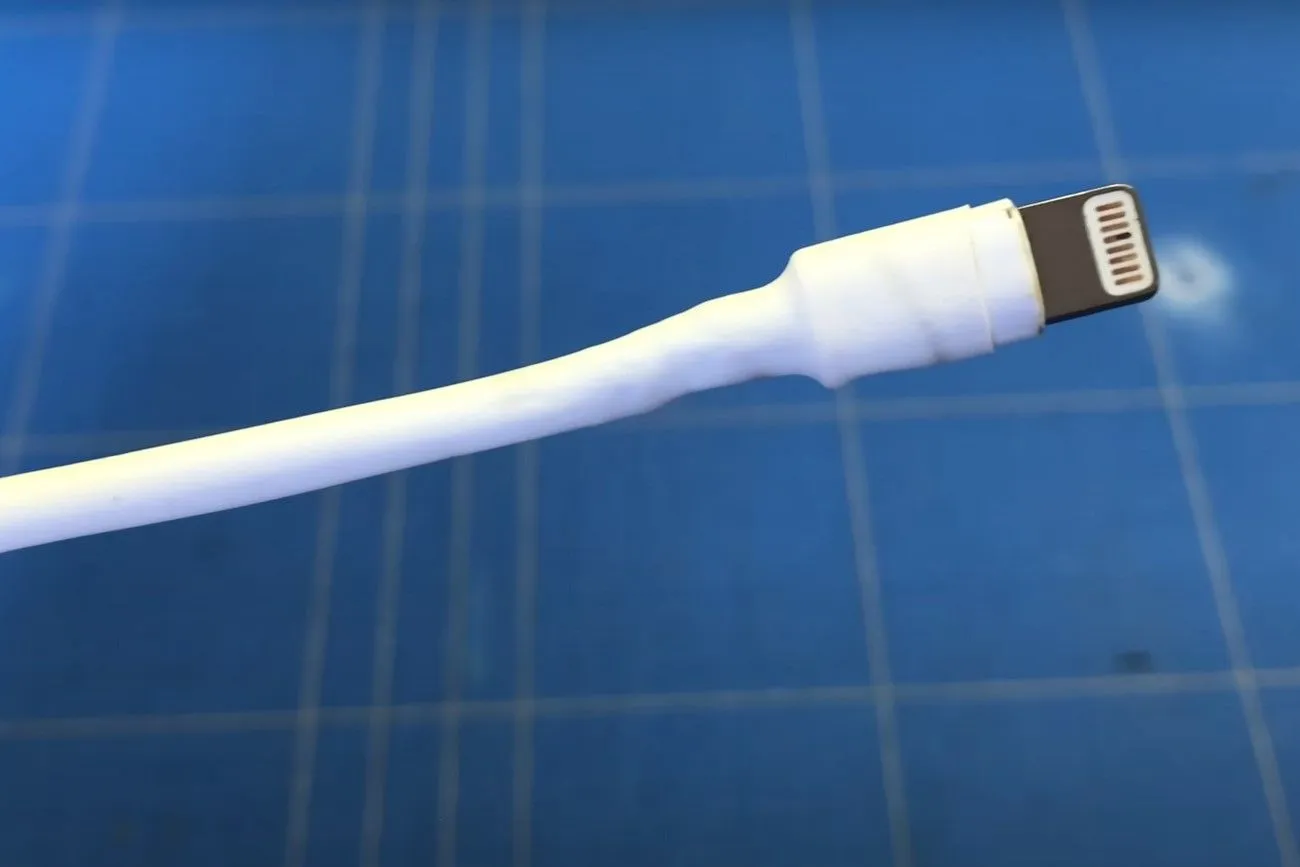
Liquid Electrical Tape on Exposed Wires
By using liquid electrical tape, you can easily fix your existing charger. Simply apply the liquid tape to the exposed wires, allowing it to dry and create a protective coating. This not only prevents potential accidents but also offers a more effective solution for addressing smaller rips or tears compared to traditional sticky tape. With this DIY fix, you can safely use your phone charger without the need for a replacement.
 @How to fix fraying cables / charging cords - 5 diy methods/Bob Bee/YouTube.com
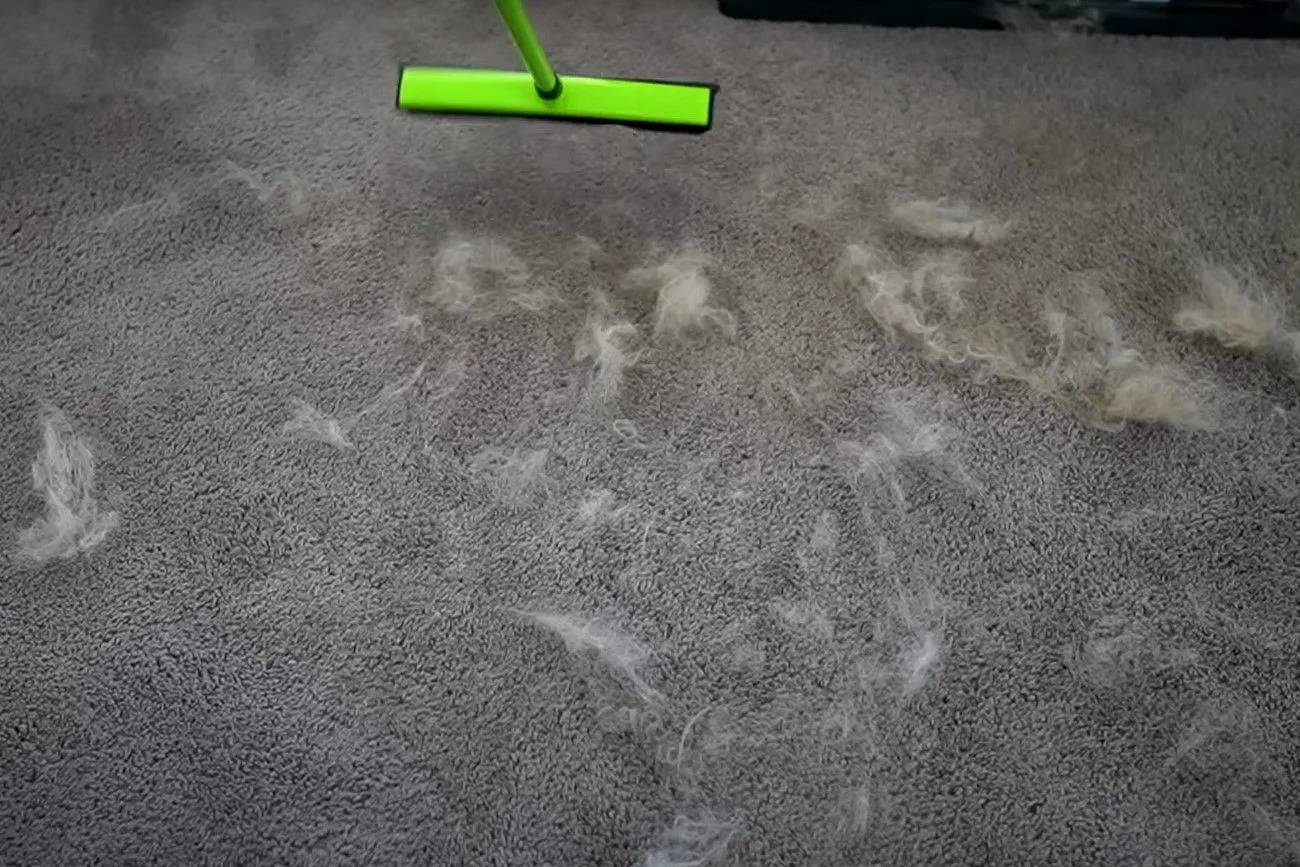
Removing Pet Hair With Squeegee
Take a window squeegee, preferably one with a rubber edge, and run it over any surface affected by pet hair. The rubber edge of the squeegee will attract and clump together the hair that may have been invisible to the naked eye. As a result, the hair becomes more visible and easier to clean up. It's worth noting that this method might reveal just how much pet hair has accumulated on your furniture, which can be quite eye-opening. So, be prepared for the possibility of discovering the true state of your couch or other surfaces. By utilizing a window squeegee, you can effectively gather and remove pet hair, helping to keep your furniture cleaner and more presentable.
 @Furwell Pet Hair Broom Review: Does it Work?/Freakin' Reviews/YouTube.com
Using Graphite in Locks
Ensuring the safety and security of our homes is a top priority for many people. However, a malfunctioning lock or key can compromise this objective. Fortunately, there's a simple solution using a spare pencil. By sharpening the tip of the pencil, you can use it to lubricate the lock, allowing your key to glide smoothly. Unlike oil, which may pose a risk of clogging, the fine particles of graphite in the pencil act as an effective lubricant without such concerns. To avoid the risk of lead getting stuck in the lock, it's advisable to sharpen the pencil with a sharp knife instead of a pencil sharpener.
 @TIP: Using a pencil to fix your door lock/GoodlyEarth/YouTube.com
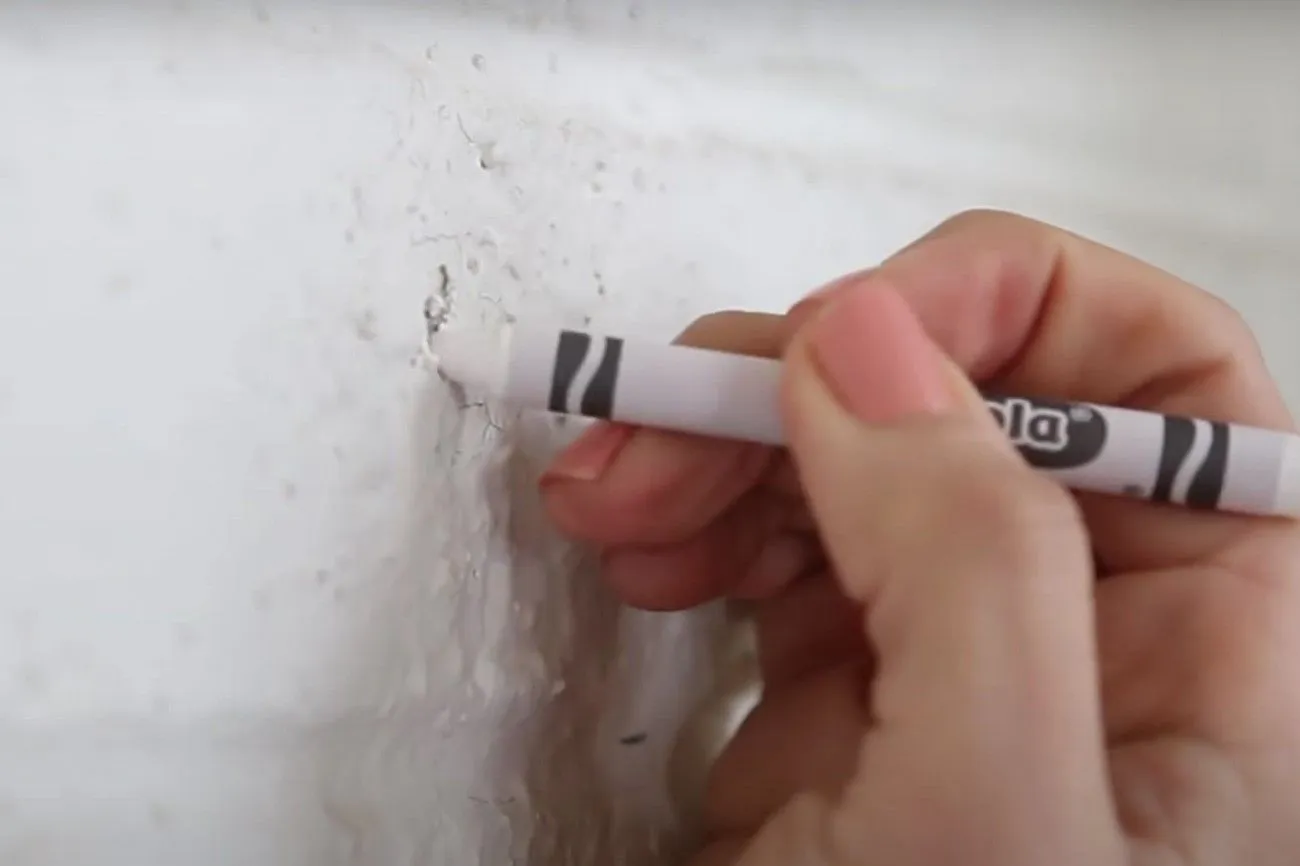
Filling Nail Holes with Crayon
Select a crayon that closely matches the color of the wall. Begin by coloring over the hole, ensuring to apply some pressure to help the wax blend seamlessly. Additionally, rubbing the crayon with your fingers will generate heat that aids in melding the wax with the wall surface. This quick and easy method allows you to conceal the hole effectively and maintain the appearance of your rented space.
 @The ‘Hole’ Truth About Filling In Nail Holes: It’s Easy! | TODAY/TODAY/YouTube.com
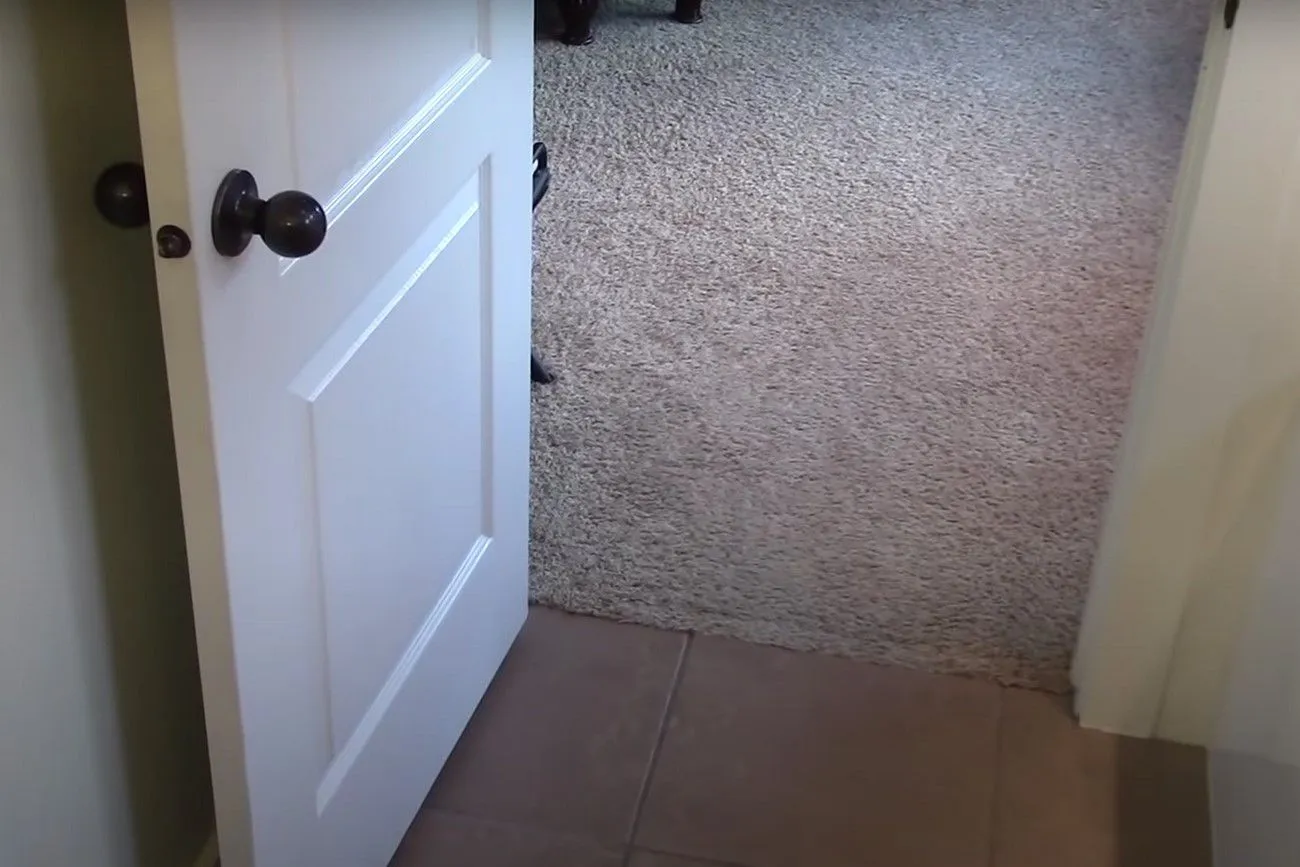
Slamming Door
Doors that consistently slam shut can be both disruptive and potentially damaging. Fortunately, there are a couple of simple solutions to address this issue. One option is to use peel-and-stick weather stripping, which can be applied around the doorframe to create a cushioning effect when the door is closed. Alternatively, you can use a wide rubber band as a quick fix. By wrapping the rubber band around both doorknobs, ensuring that the latch remains uncovered, you can provide a soft buffer that prevents the door from slamming shut forcefully. These solutions offer an effective way to reduce noise and minimize potential damage caused by slamming doors.
 @How To Fix a Door That Won't Latch- It's Simpler Than You Think!/The Funny Carpenter/YouTube.com
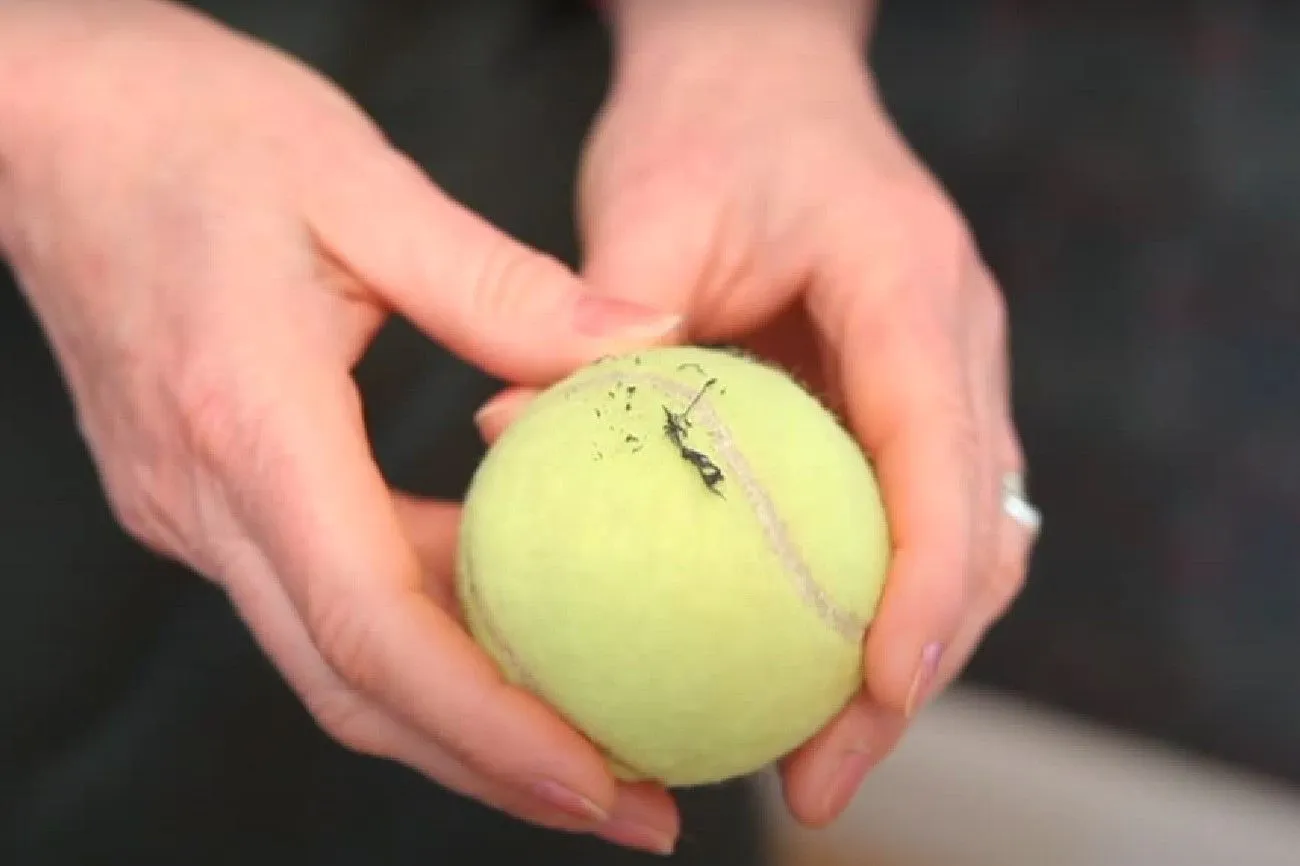
Scuffed Floors
Simply attach a tennis ball to the end of a mop or broom handle or take only by a tennis ball, and you'll be able to effortlessly buff out scuffs. The material of the tennis ball is excellent at picking up rubber marks from the floor. Moreover, using it on a stick provides better control over the pressure and direction, allowing you to effectively remove scuffs with precision.
 @Tennis Ball Tips for Wiping Away Scuff Marks : Clean in :30/ehowathomechannel/YouTube.com
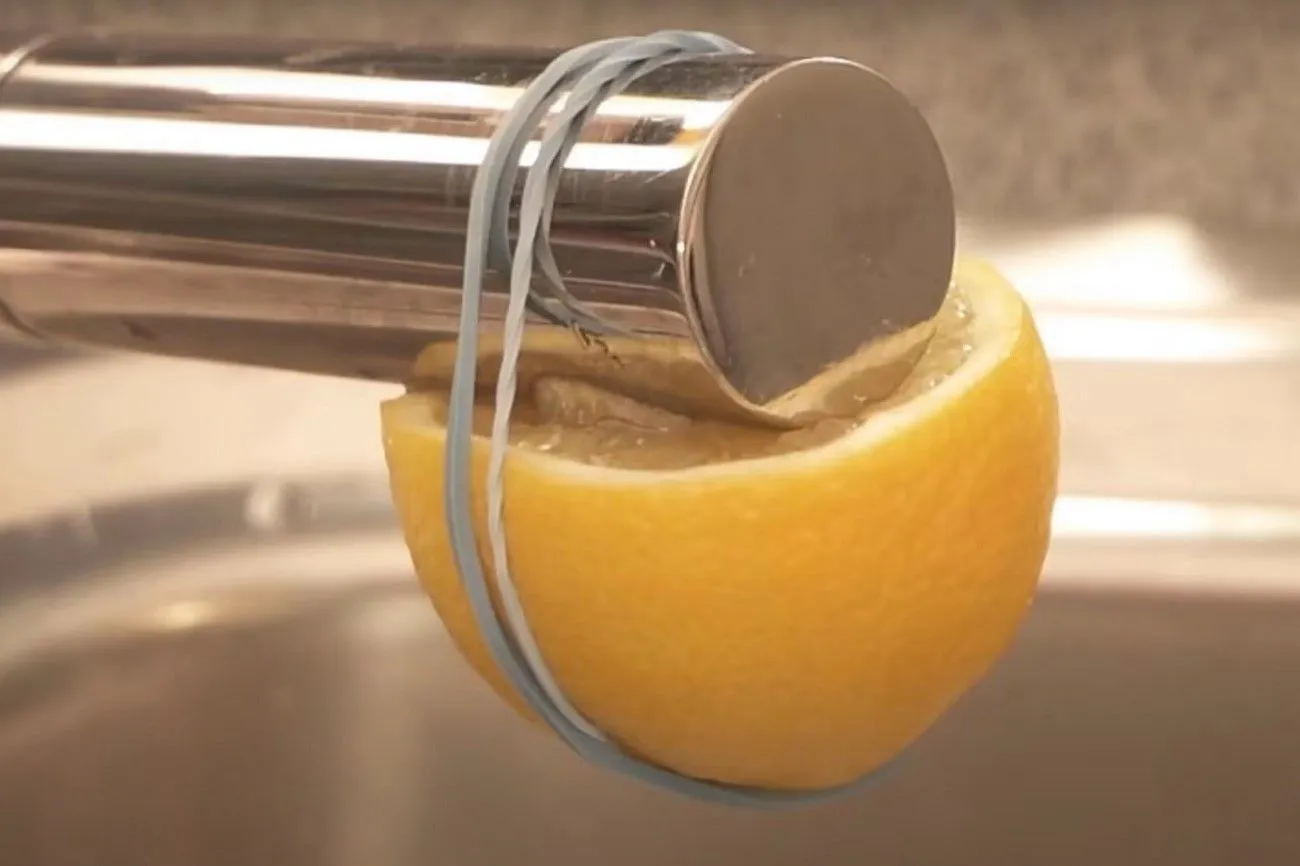
Lemon Hard Water Cleaner
There's a natural solution that can save you from calling a plumber or purchasing a new faucet. Look no further than your fruit bowl. Take a fresh lemon and cut it in half. Position the faucet in the center of the lemon, then enclose the lemon and fix the faucet with rubber bands. After a few hours, the citric acid from the lemon will work its magic, effectively breaking down the build-up and restoring your fixtures to their former glory.
 @THIS is why you should wrap a LEMON around your FAUCET 💥/Smart Fox/YouTube.com
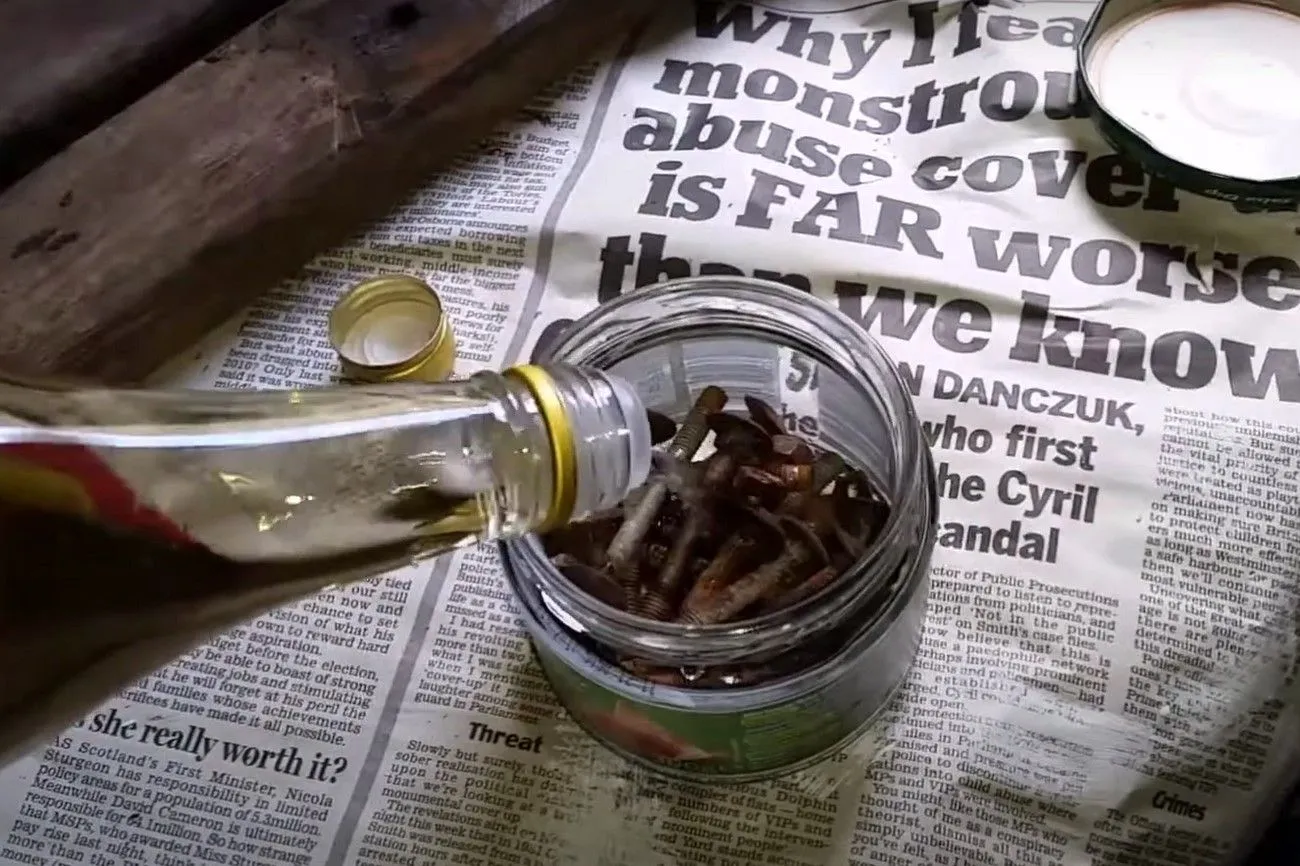
Cleaning Screws in Vinegar
To remove rust from screws, immerse them in a vinegar bath for 24 hours, ensuring the lid is tightly sealed to prevent oxygen from entering. Additionally, periodically shaking the screws within the vinegar bath every few hours can help expedite the process of loosening the rust. This effective method will help restore your screws to their optimal condition, ready for use in your project.
 @Restoring rusted nuts and bolts with vinegar/consumedbynature/YouTube.com
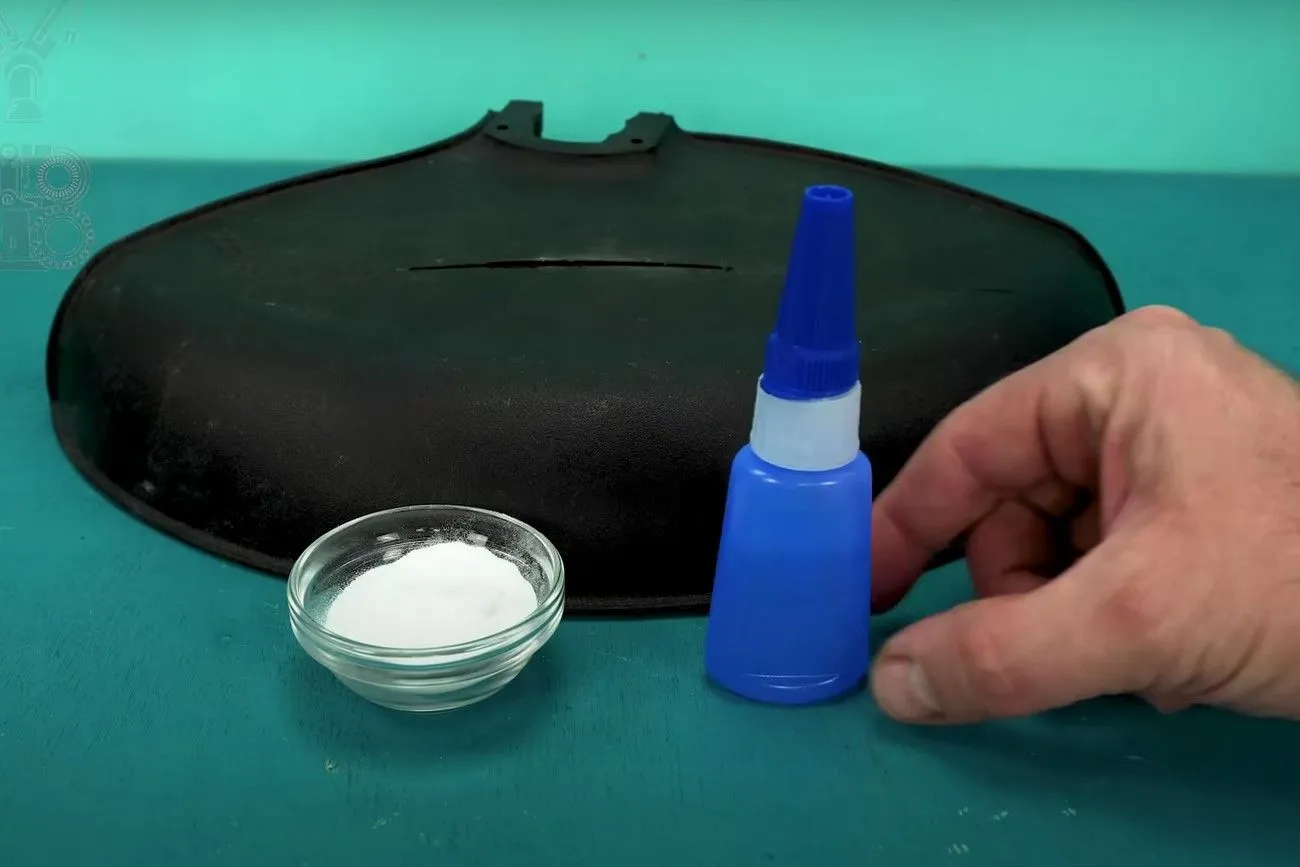
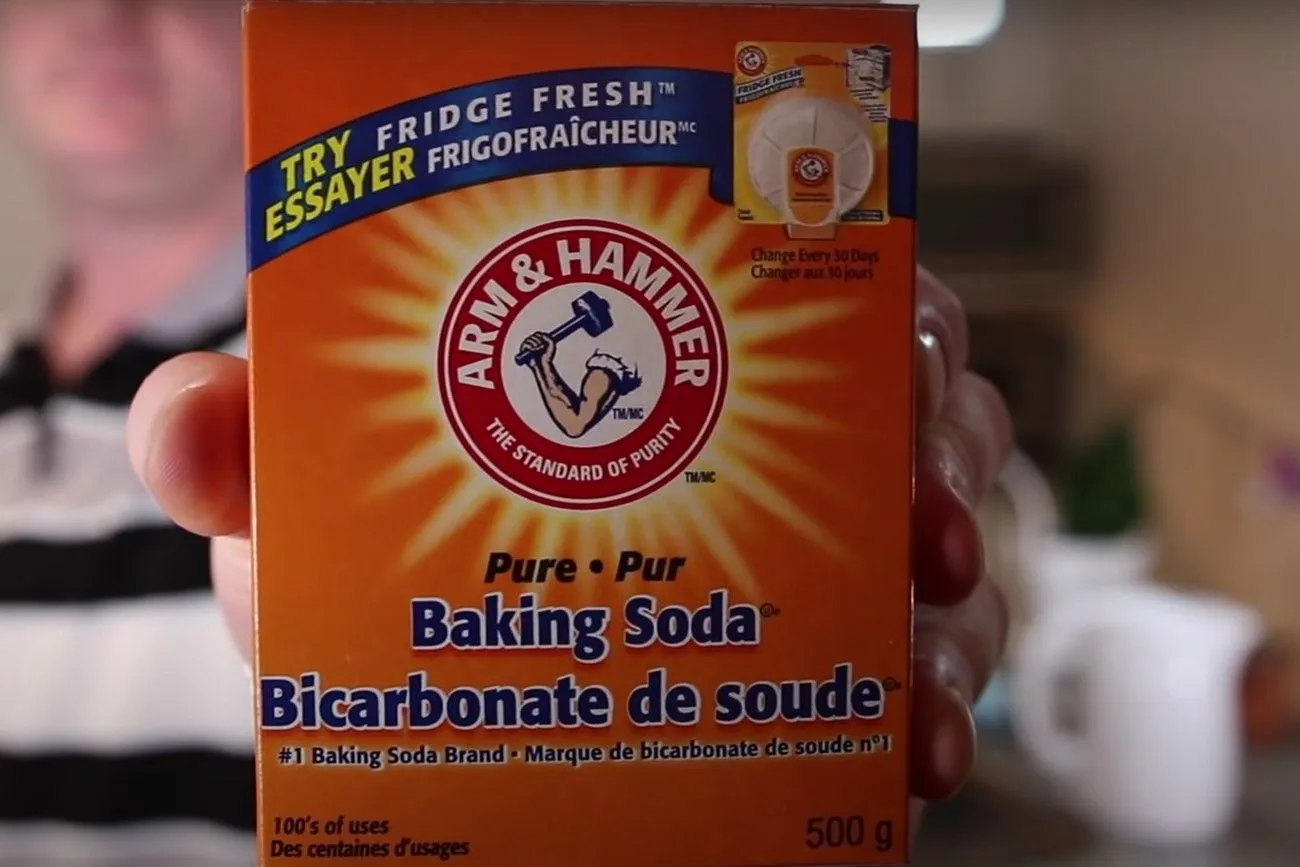
Making a Malleable Plastic
Mixing baking soda with regular superglue transforms it into a plastic-like substance. This unique combination can effectively fill holes and seal gaps. With its remarkable durability, you only need a small amount of superglue followed by the application of baking soda onto the surface. Press firmly with a cloth, and within seconds, your task will be complete.
 @Super Glue and Baking soda ! Pour Glue on Baking soda and Amaze With Results/Tips and Hacks/YouTube.com
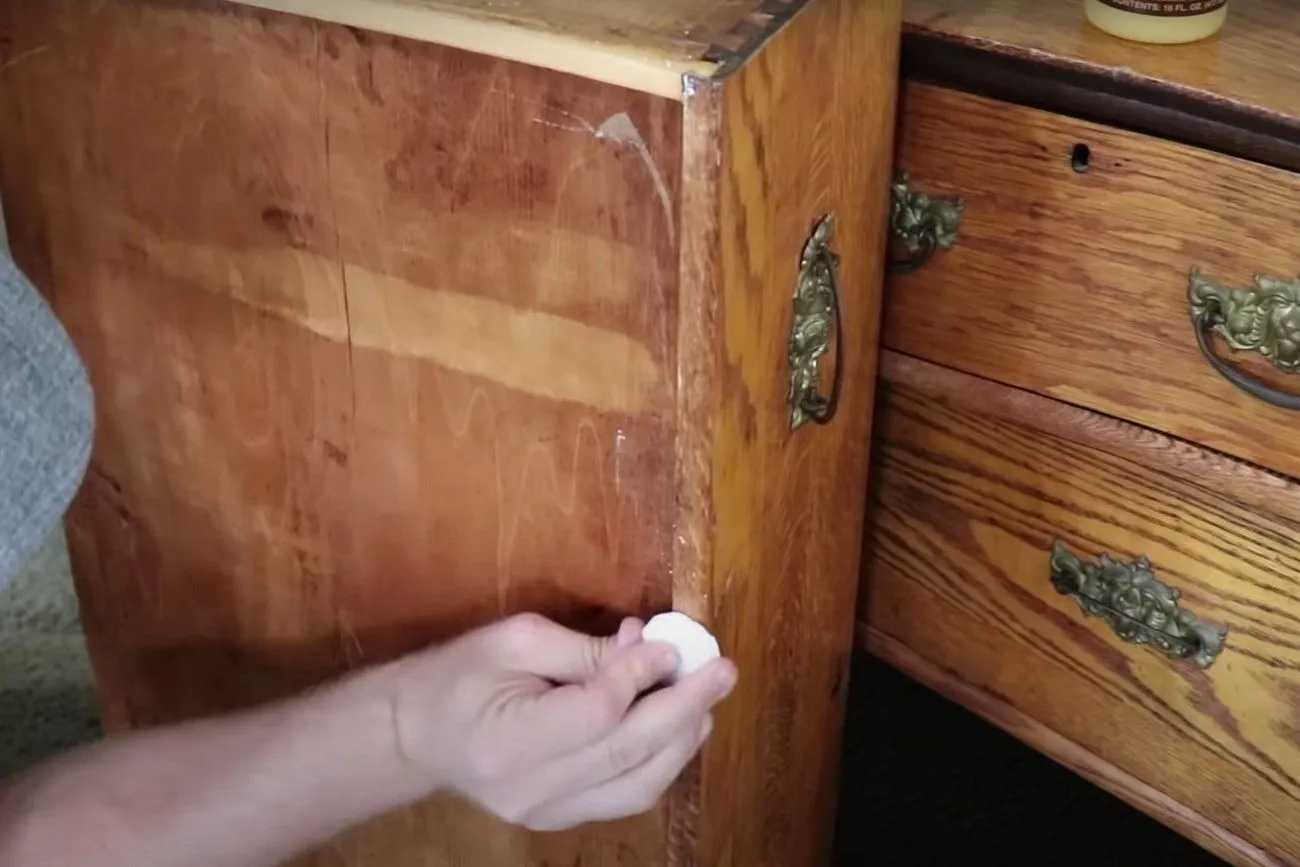
Unsticking Drawers With Wax
Over time, drawers can lose their functionality and become a source of frustration. Fortunately, there's a simple solution to revive your drawers. By applying a small amount of wax (or even soap if wax is unavailable) to the drawer runners, you can effectively lubricate them. This eliminates sticky or jammed drawers and breathes new life into your furniture.
 @How To Make That Sticky Drawer Slide Better/Jami Ray Vinta/YouTube.com
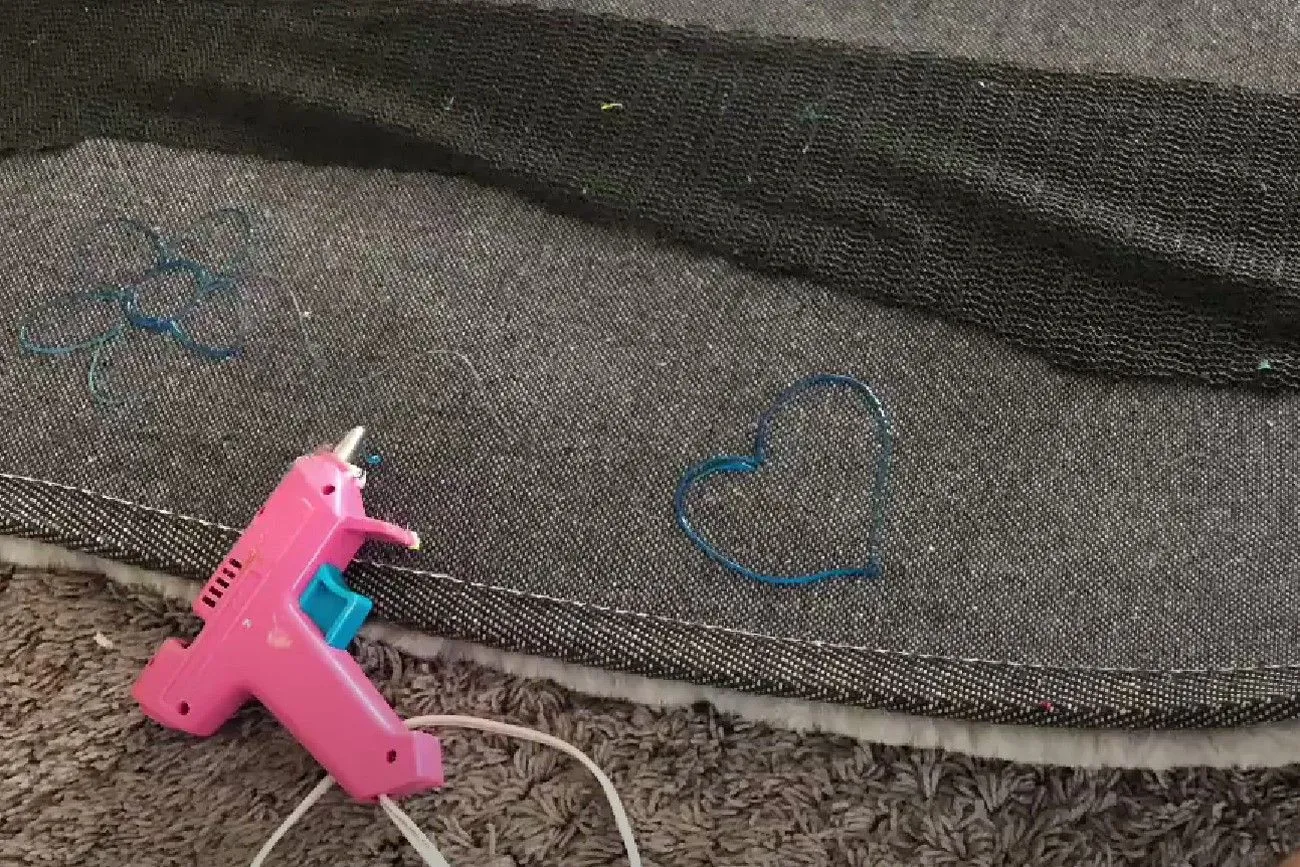
Glue Grip on Carpets
If you've encountered the frustrating issue of a slippery carpet or rug, there's a simple DIY solution to prevent any unexpected slips or falls. By flipping the carpet or rug upside down and using a hot glue gun, you can create grips that provide traction. Whether you opt for squiggles or straight lines, the hardened glue will act as a non-slip surface, ensuring that the carpet or rug stays securely in place. With this handy hack, you won't need to spend extra money on purchasing a separate non-slip rug.
 @How to stop your carpet rug or matt from sliding/DO IT YOURSELF ITS EASY/YouTube.com
Oil Spills and Cat Litter
If you're tackling a garage cleanup and struggling to remove spilled oil, you're not alone. Traditional mopping tends to spread the oil and absorb it into the mop, making the cleanup process more challenging. Water alone also doesn't effectively mix with oil. However, there's one material that has proven to be highly effective—cat litter! While it may require some effort to ensure complete removal of every grain of litter, it excels at absorbing oil. Once you're finished, simply scoop up the litter and dispose of it in the trash.
 @Nature's Miracle Kitty Litter To Clean Up Oil Spills/Distractor_Beam Reviews/YouTube.com
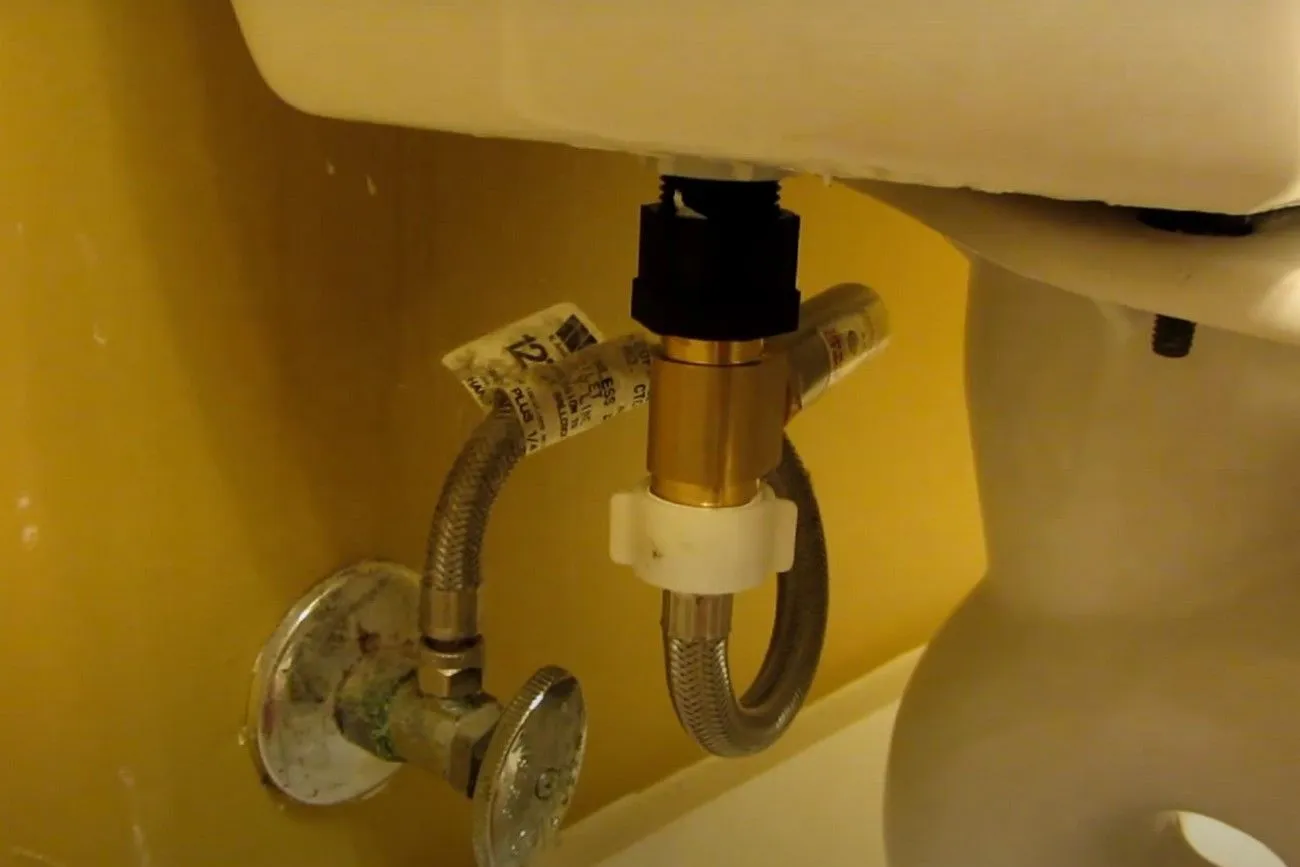
Fast Flushing Toilet
If you frequently encounter the need for multiple flushes to effectively clear the toilet, it is possible that there is an issue with the water pressure. Insufficient pressure can hinder the tank from swiftly refilling with water, causing delays. Fortunately, resolving this problem is quite simple. Locate the water valve positioned behind the toilet and rotate it counterclockwise until it reaches its fully "on" position, indicated by a stop in your hand's motion. Even a partially closed water valve can impede the quick refilling of the tank, so ensuring it is fully open is essential.
 @How to Fix Vibration Noise on Toilet Water Valve/Poolarity - Life Hacks/YouTube.com
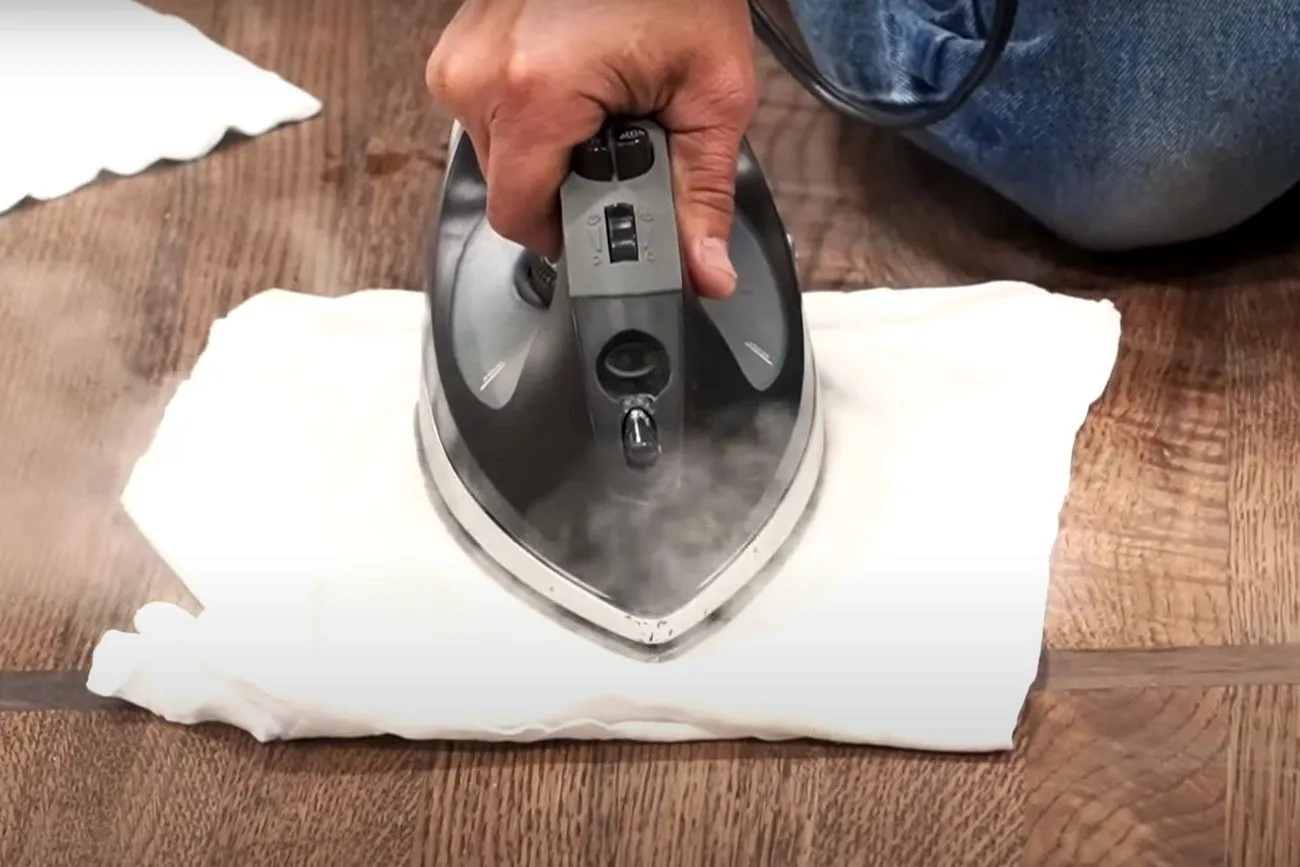
Fixing Dents in Wooden Floors
While it may not be the most pressing DIY project on your list, you'll be pleasantly surprised by how simple and effective this method is for fixing small dents on wooden floors or furniture. With just a bit of water and an iron, you can easily remove those unsightly dents. Start by wetting the dent and then covering it with a damp towel. Next, gently move the iron in a circular motion over the towel. As you do so, you'll witness the magic of the dent gradually disappearing, leaving your floor or furniture looking as good as new! So, keep an eye out for any dents and enjoy the satisfaction of restoring your wooden surfaces with this easy technique.
 @How To Remove a Dent From Hardwood Floor with Lenny Hall | City Floor Supply | NWFA/City Floor Supply/YouTube.com
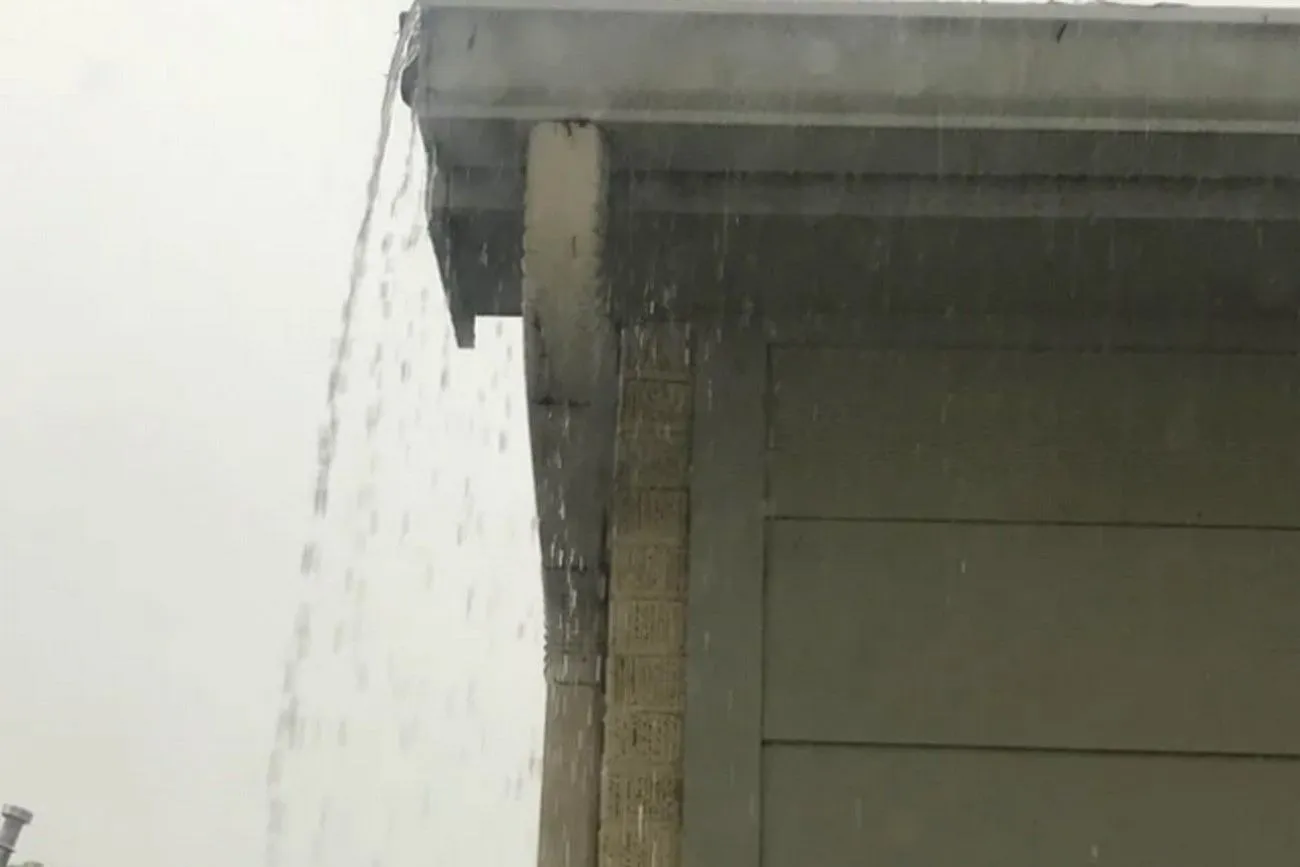
Gutter Overflowing
In regions with frequent rainfall or during the rainy season, gutter issues can arise, such as water overflowing from the sides of the house due to a clogged downspout. To address this problem, a straightforward solution can be implemented. Start by flushing the gutters with water, ensuring a clear flow. Next, take a wire coat hanger and utilize it to remove any loosened debris from the gutters, including the downspout. By combining these steps, you can effectively unclog the downspout and restore proper water drainage from your gutters.
 @Maerien-Nelliththor/reddit.com
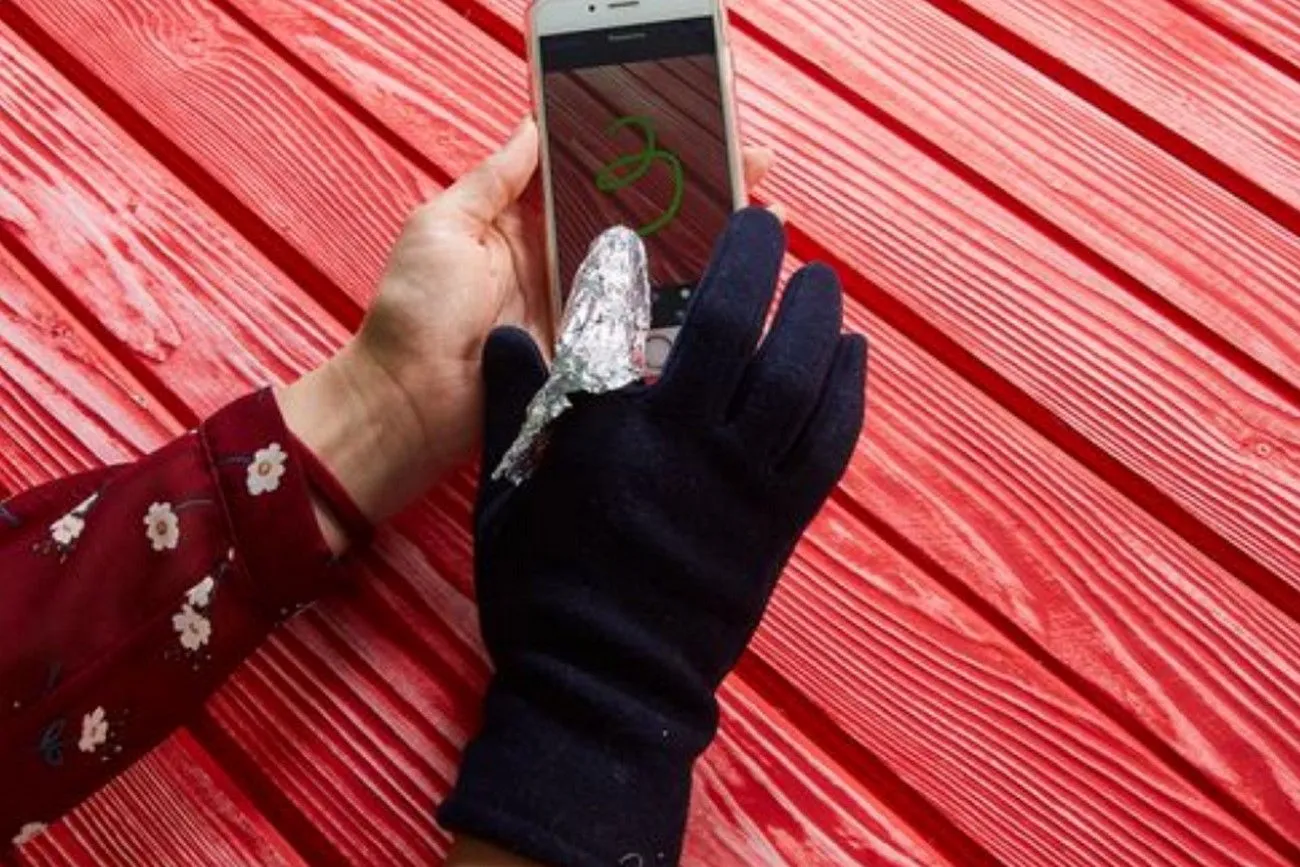
Aluminum Foil and Gloves
This DIY project is incredibly simple and convenient, making your daily life a little easier. If you find yourself needing to use your phone in cold weather without exposing your hands to the chilly air, this hack is for you. Instead of purchasing expensive touchscreen-friendly gloves, you can opt for a more affordable solution using aluminum foil. All you need to do is wrap the foil around the fingers you intend to use with your phone, and it should enable seamless touchscreen functionality. It's a cost-effective alternative that ensures you can comfortably use your phone without sacrificing warmth.
 @22 BEST ALUMINUM FOIL HACKS/5-Minute Crafts FAMILY/YouTube.com
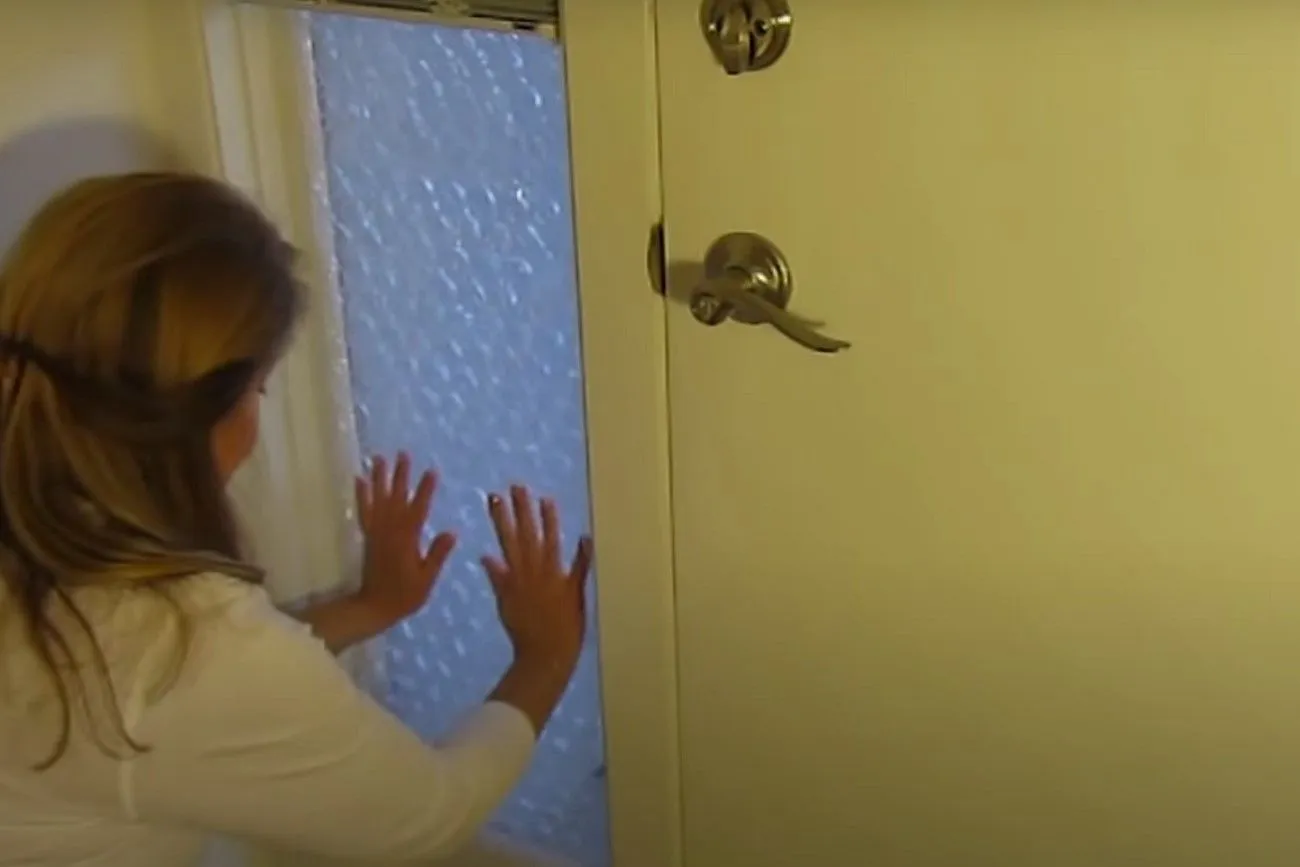
Keeping Your Home Warm
In the chilly winter months, it becomes essential to keep the warmth inside our homes. While various methods like lighting fires or keeping the heating on all day are common, there's a simple and cost-effective way to insulate your house using bubble wrap. By cutting bubble wrap to the size of your windows, spraying water on the bubble side, and pressing it against the window, you can create an effective barrier that prevents heat from escaping. This DIY solution helps to trap the warmth inside and keep your home cozy. It's important to note that bubble wrap may not be as effective during the summer months when the sun's heat can contribute to a buildup of warmth.
 @3 Easy Ways To Stop Heat Loss From Your Home Winterize Doors Windows Walls/AlaskaGranny/YouTube.com
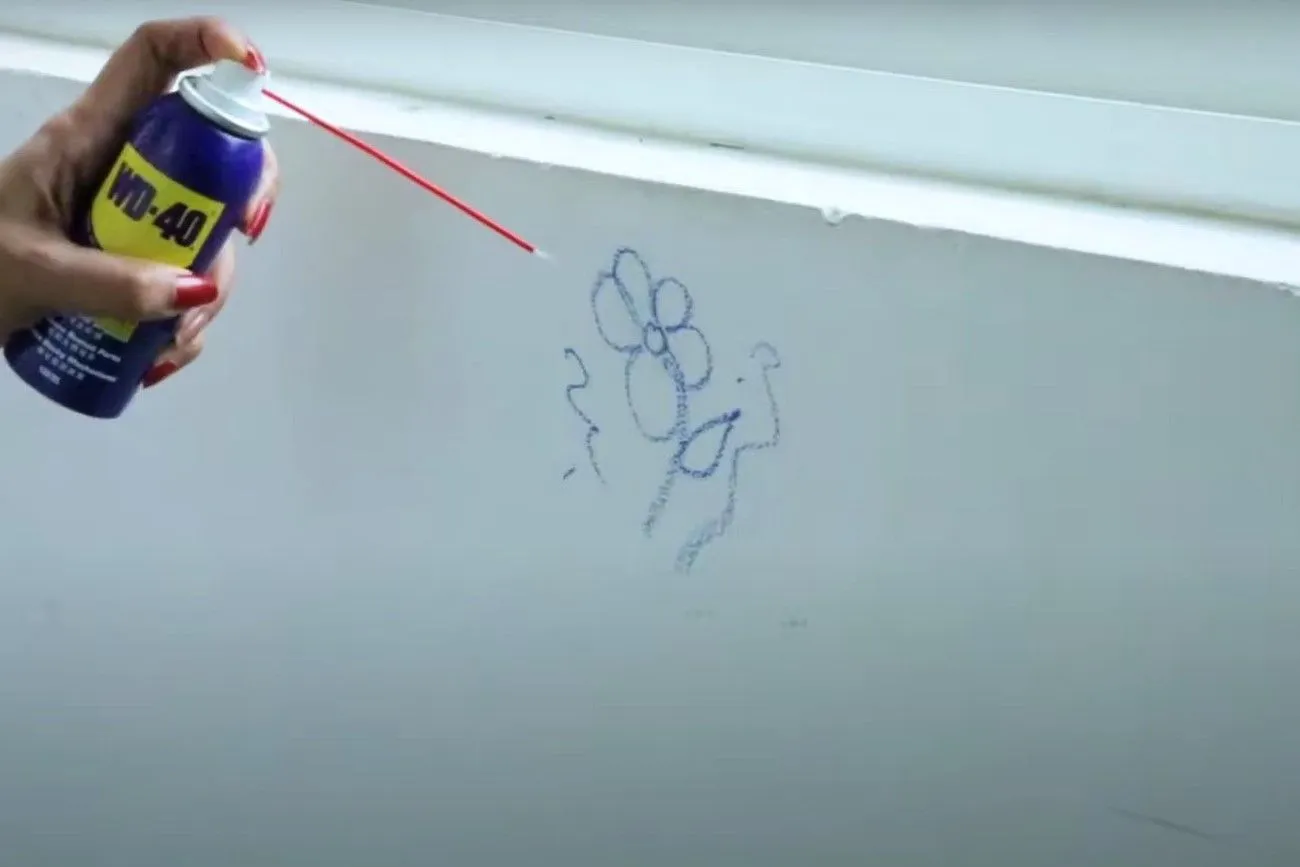
Removing Crayons From the Walls
If you find your children expressing their artistic talents on your freshly painted walls, there's a simple solution that can save you from repainting or scrubbing endlessly. WD-40 comes to the rescue! To remove those crayon marks, spray a suitable amount of WD-40 directly onto the affected area. Let it sit for a few minutes, and then use a clean cloth to wipe away the artwork from the wall. Your wall should be restored to its previous state, and now you know what to do if it happens again!
 @Wipe out crayon drawings on walls easily with WD-40/DIMO/YouTube.com
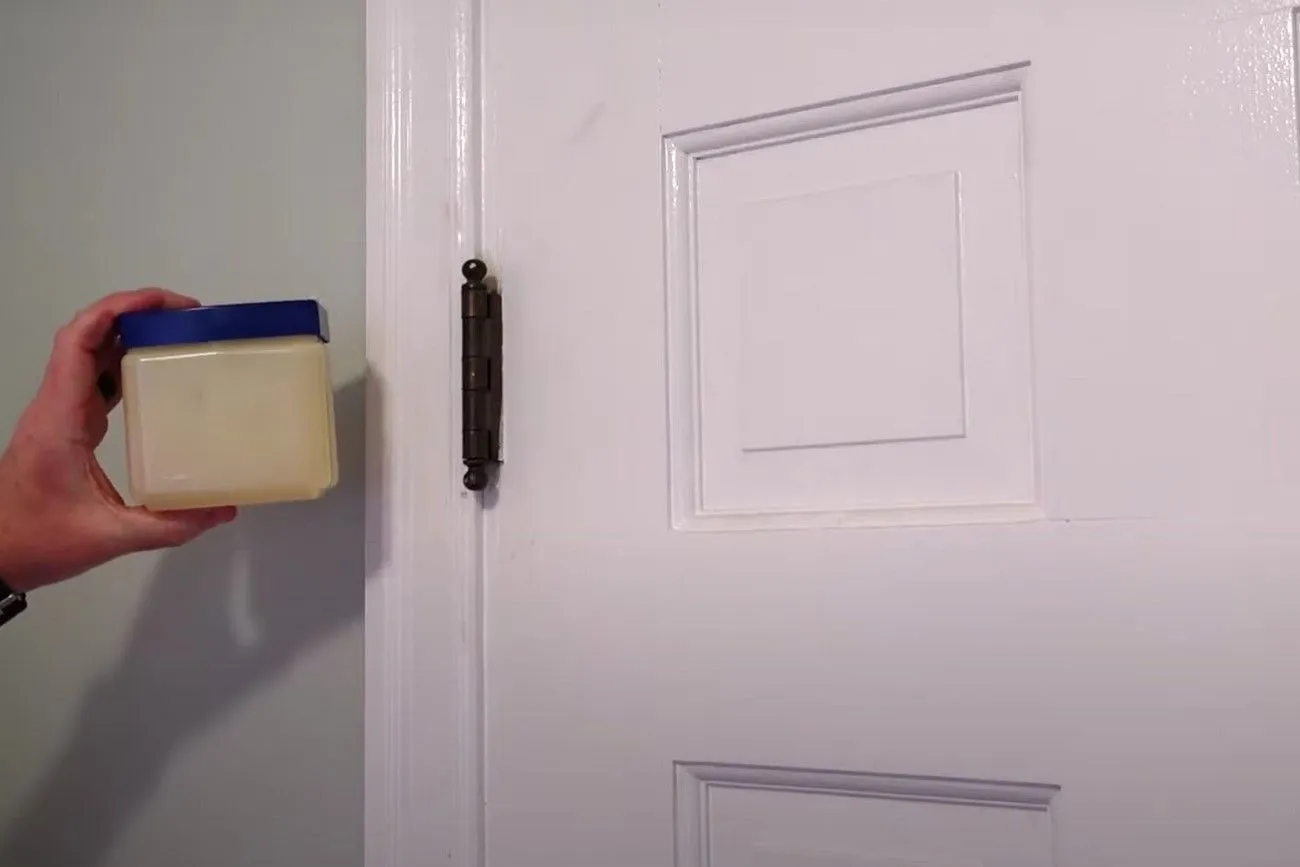
Vaseline to Fix Hinges
If you're dealing with a persistently squeaky door that has resisted other lubricants, you may want to give petroleum jelly a try. By applying a small amount of petroleum jelly to the hinge, you can eliminate the creaking sound that's been haunting your house. Unlike other oils or lubricants, petroleum jelly has a unique texture and viscosity that allows it to work its way into the hinges and adhere effectively, preventing runoff. So, give petroleum jelly a chance and bid farewell to that annoying door squeak.
 @How to Quiet Squeaky Door Hinges - EASY FIX/Fix it Flip/YouTube.com
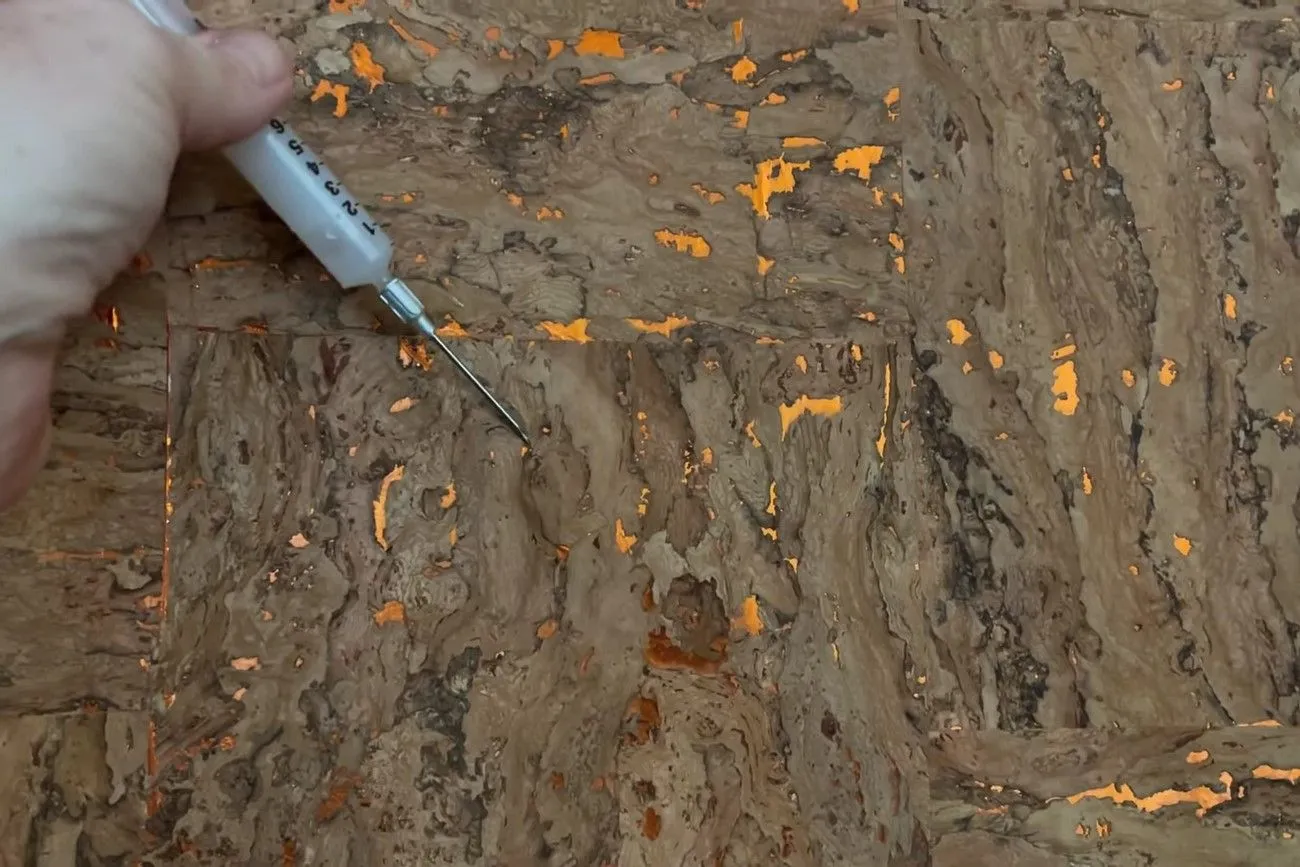
Wallpaper Air Bubbles
After spending a whole day applying wallpaper, it can be frustrating to discover a bubble in the finished result. The last thing you want to do is redo the entire application. Fortunately, there is a straightforward solution to this problem. First, check if there is any debris trapped inside the bubble. If you find debris, make an X-shaped incision and apply adhesive behind it to secure the wallpaper. On the other hand, if there is no debris, you can easily fix it by using a syringe to create a small hole in the wallpaper. Then inject adhesive through the hole to flatten the bubble and ensure it stays in place. This method allows for a quick and effective repair without the need for extensive reapplication.
 @How to Remove Air Bubbles From Wallpaper - Spencer Colgan/Spencer Colgan Wallpaper & Pain/YouTube.com
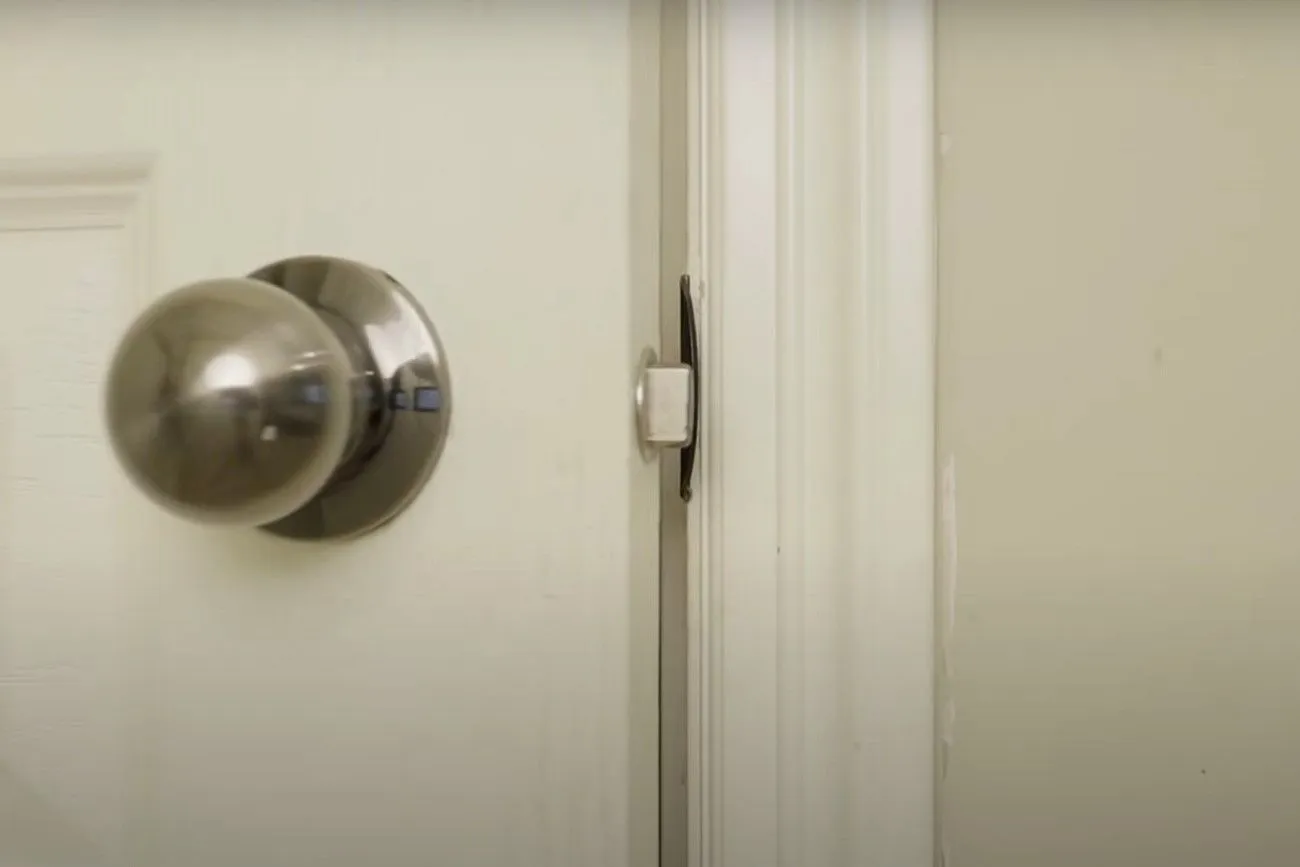
Doors That Open By Themselves
If you find that your doors are swinging open or closing on their own due to loose or misaligned hinge pins, there's a simple fix that requires minimal effort. Begin by removing the hinge pins from the door by pulling them out. Lay the pins on a sturdy surface and use a hammer to gently tap the middle of the pin. This will help straighten the pin and restore its proper alignment. Once the pins are straightened, reinsert them back into the hinges. Finally, place the door back in its original position, ensuring that the hinge pins are securely in place. Your door should now swing smoothly and stay in the desired position.
 @How to stop a door from swinging open/AdamDIY/YouTube.com
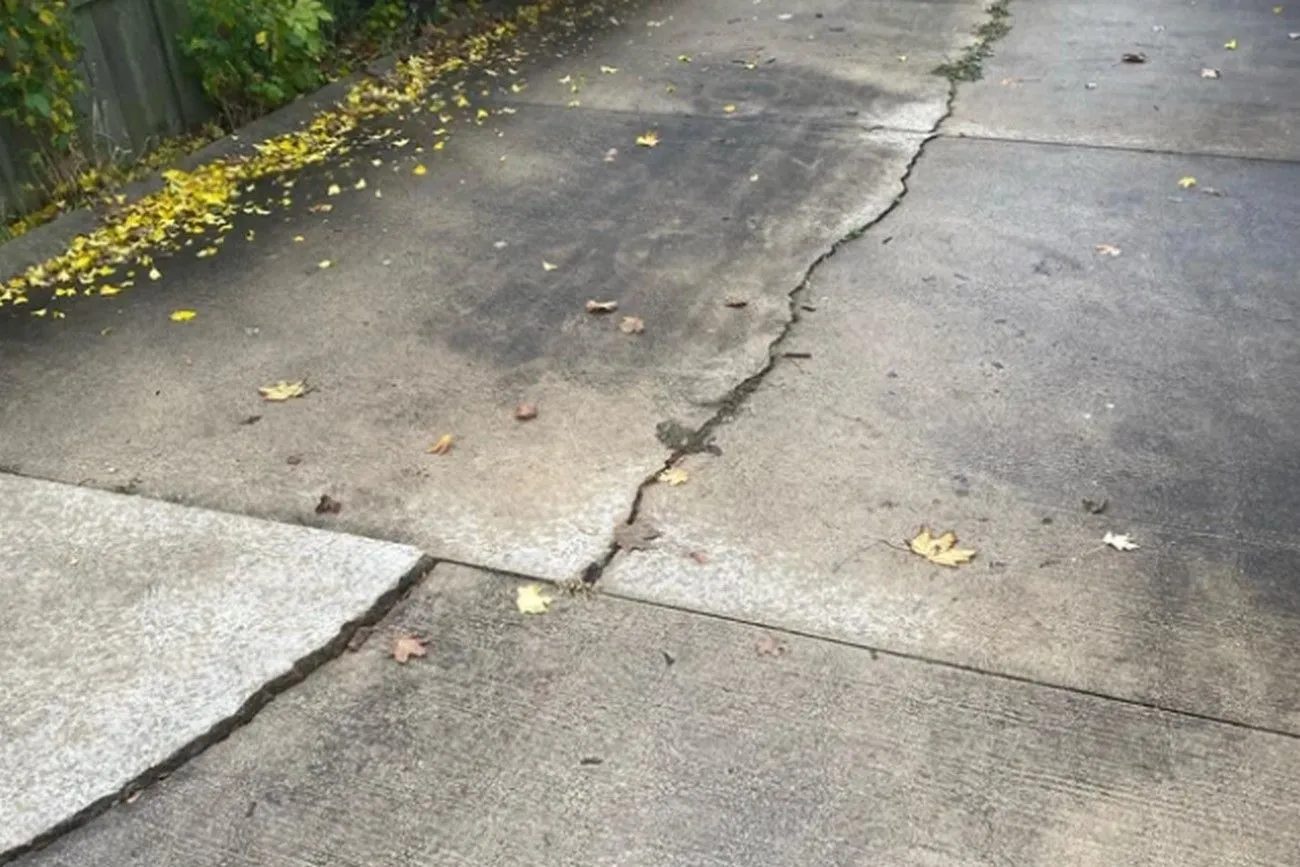
Widening Driveway Cracks
In areas with severe winters and freezing conditions, it's common to observe the formation of cracks in driveways. When water enters these small cracks and freezes, it expands, causing the cracks to enlarge over time. It's important to address these cracks promptly to prevent further damage. Fortunately, a simple solution is available. You can use cold-pour filler to fill in the cracks. To do this, apply the cold pour filler directly into the cracks, ensuring that it fills the entire gap. The filler will help seal the cracks and prevent them from expanding or causing property damage.
 @Brainles/reddit.com
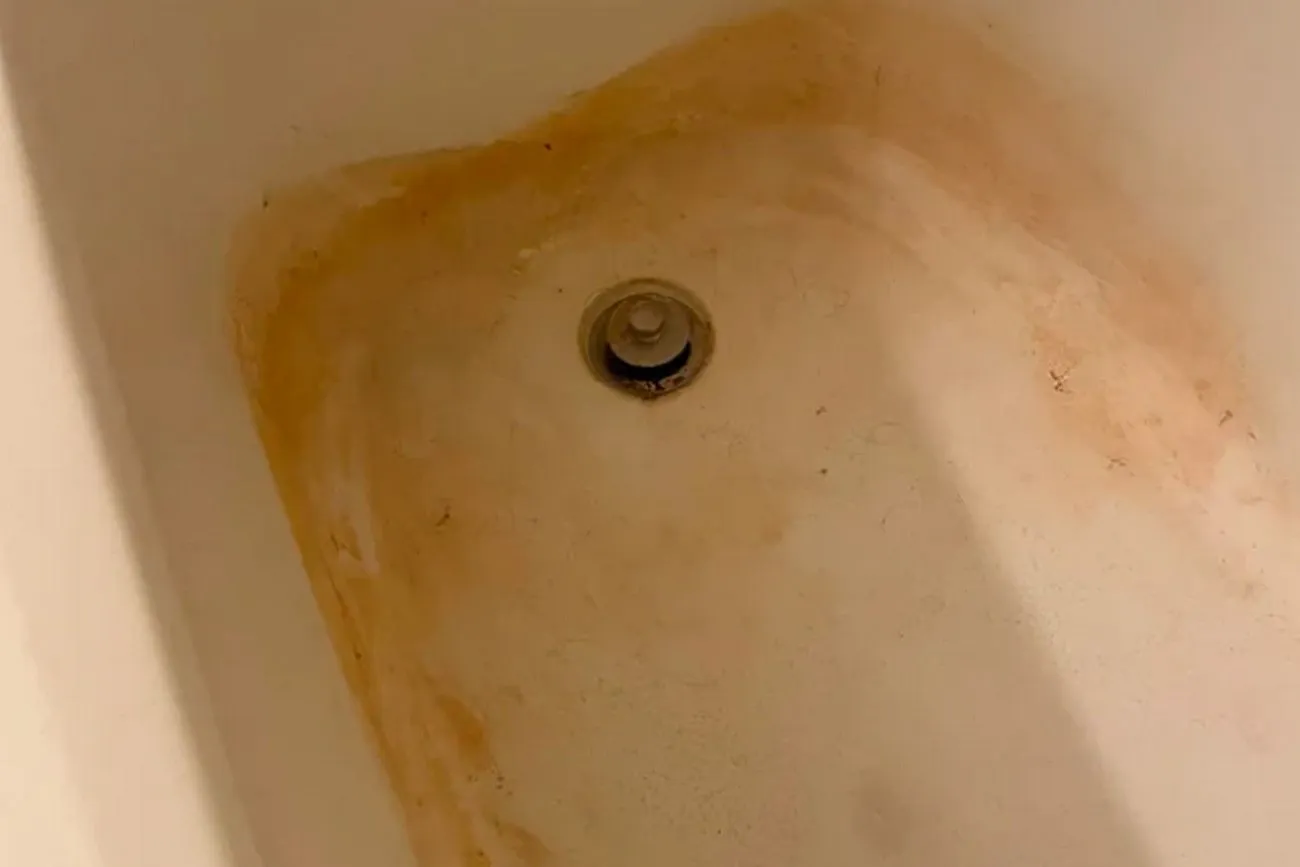
Stained Bathtub
A stained bathtub can significantly detract from the overall appearance of a bathroom, giving it an aged and unclean look. However, restoring the bathtub's shine and cleanliness is relatively simple and requires a basic solution along with some effort. To tackle the stains, you can create a paste by combining equal parts of cream of tartar, baking soda, and lemon juice. Thoroughly mix these ingredients until a paste-like consistency is achieved, and then apply it to the surface of the bathtub. Allow the paste to sit for approximately 30 minutes, and then wipe it off. You should notice a renewed and refreshed bathtub, free from stains and discoloration.
 @cuddlerecoil/reddit.com
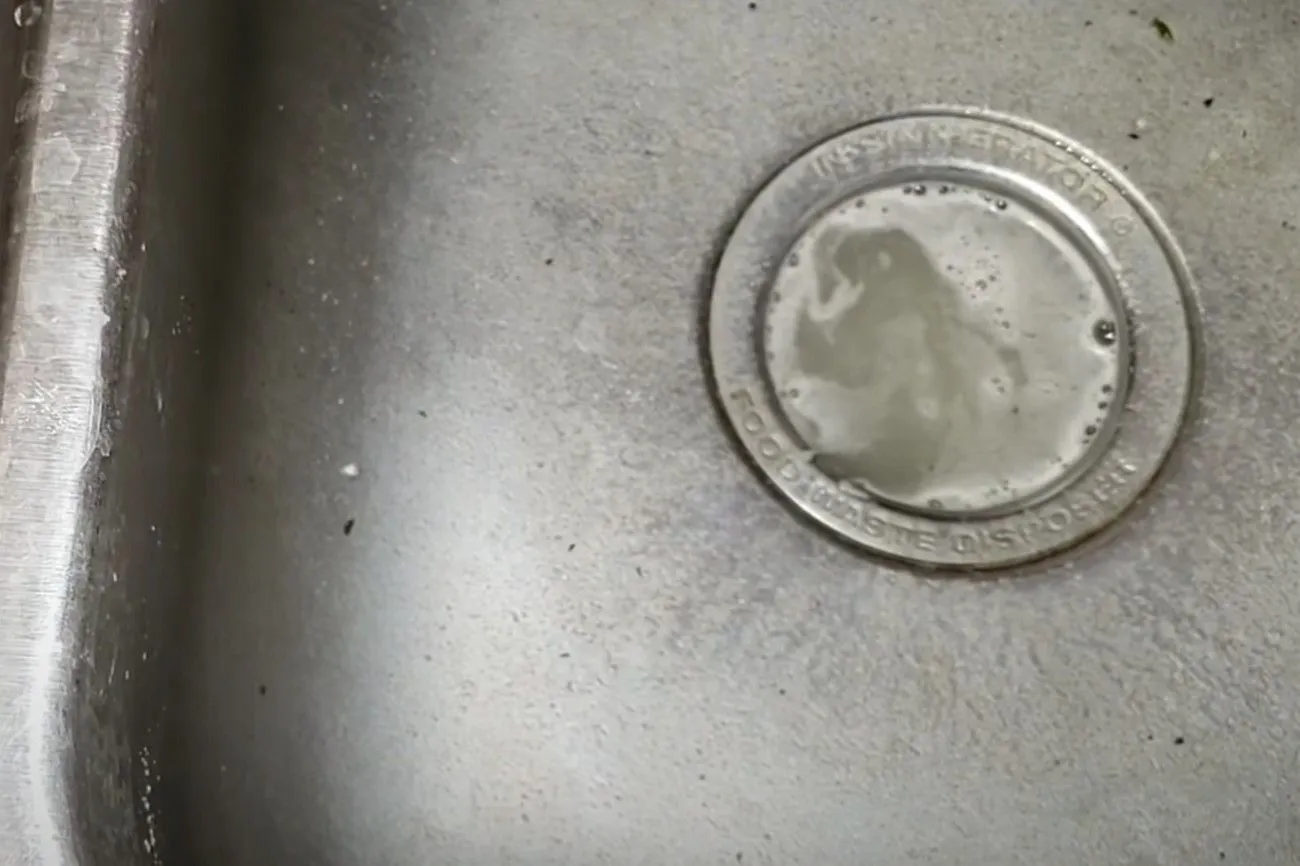
Blocked Up Garbage Disposal
When faced with a malfunctioning garbage disposal, many individuals choose to replace it entirely. However, there's an alternative approach that allows you to attempt a DIY fix. Begin by ensuring the disposal is turned off. Next, locate a pair of kitchen tongs that you can use to reach down and extract any obstructions causing the problem. If this initial step doesn't resolve the issue, you can try rotating the blades using the handle of a broom and repeat the process.
 @Garbage Disposal Clogged? Sink Clogged? Not Draining?/Sam/YouTube.com
Rusty Sink
Certain kitchen materials, if left in the sink for an extended period, can lead to rusting, even on stainless steel surfaces. An example is a cast iron pan that was left to soak overnight, resulting in rust stains around the sink. To address this issue, you can begin by creating a mixture of baking soda and vinegar. Apply the mixture to the stain and allow it to sit for approximately 10 minutes. Then, use a scrub pad to gently remove the rust stain from the sink.
 @Da-Vin-chi/reddit.com
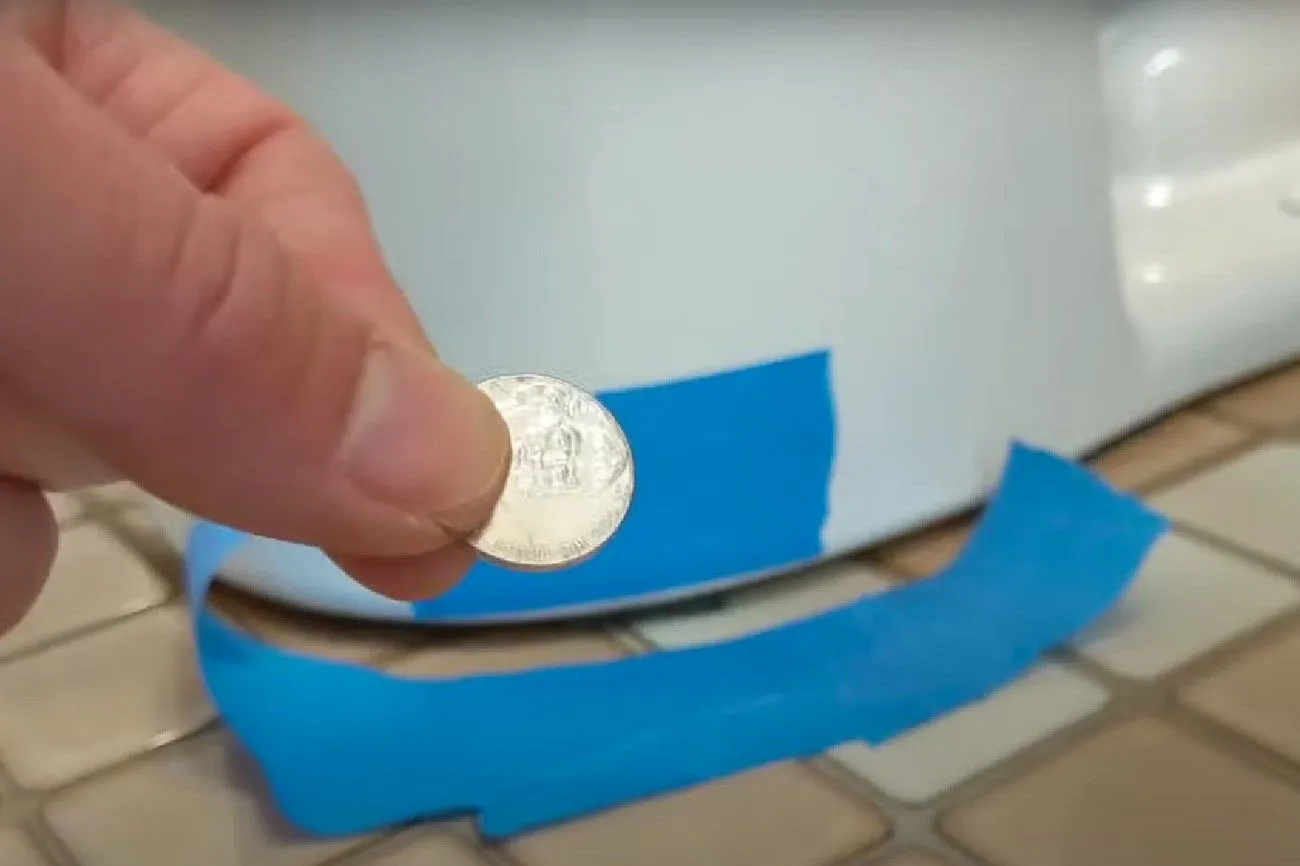
Using Pennies as Shims
If you've noticed that your toilet is wobbly or unstable, there's a simple and cost-effective fix that doesn't require calling a plumber. In lieu of toilet shims, you can utilize a humble penny to address the issue. By placing one or more pennies under the foot of the toilet, you can help stabilize it. Additionally, you can use a silicone gun to secure the base of the toilet to the floor, further enhancing its stability. With this DIY solution, you can regain confidence in your toilet's steadiness without incurring significant expenses.
 @At Home With Honest Home - Episode 6: Shimming & Caulking a Toilet/Honest Home Inspection/YouTube.com
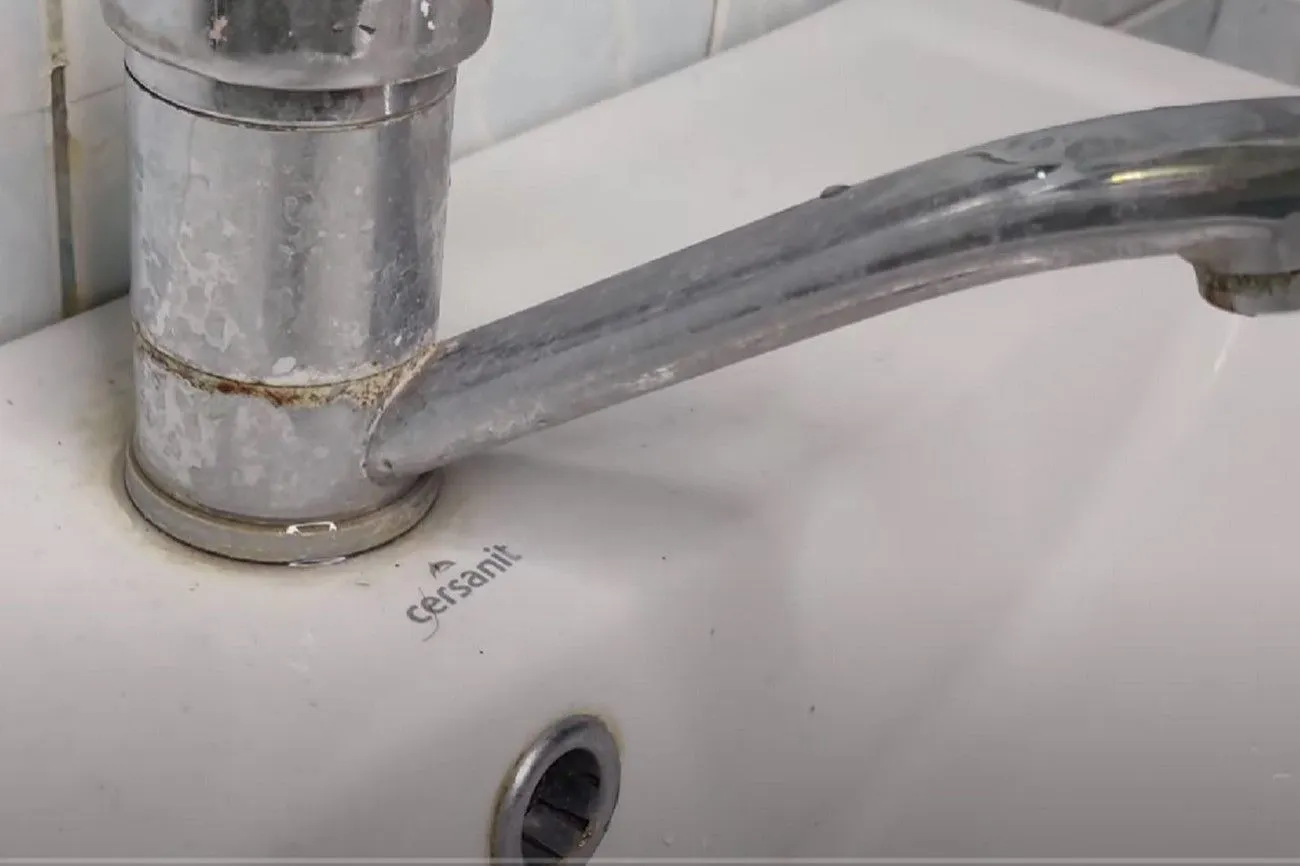
Lime Deposits
In areas with hard water, the presence of minerals can lead to the accumulation of unsightly lime deposits in sinks and other fixtures. However, there are effective ways to tackle this issue. One method involves using white vinegar and paper towels. Soak the paper towels in white vinegar and place them over the areas with heavy lime deposits. The acidic properties of vinegar help to break down and dissolve the lime, making it easier to remove. It's important to note that while this method can effectively remove lime deposits, it may also cause temporary discoloration on certain surfaces.
 @How to Remove Hard Water Buildup From Faucet | Easy Hard Water Stain Removal/Home Tips/YouTube.com
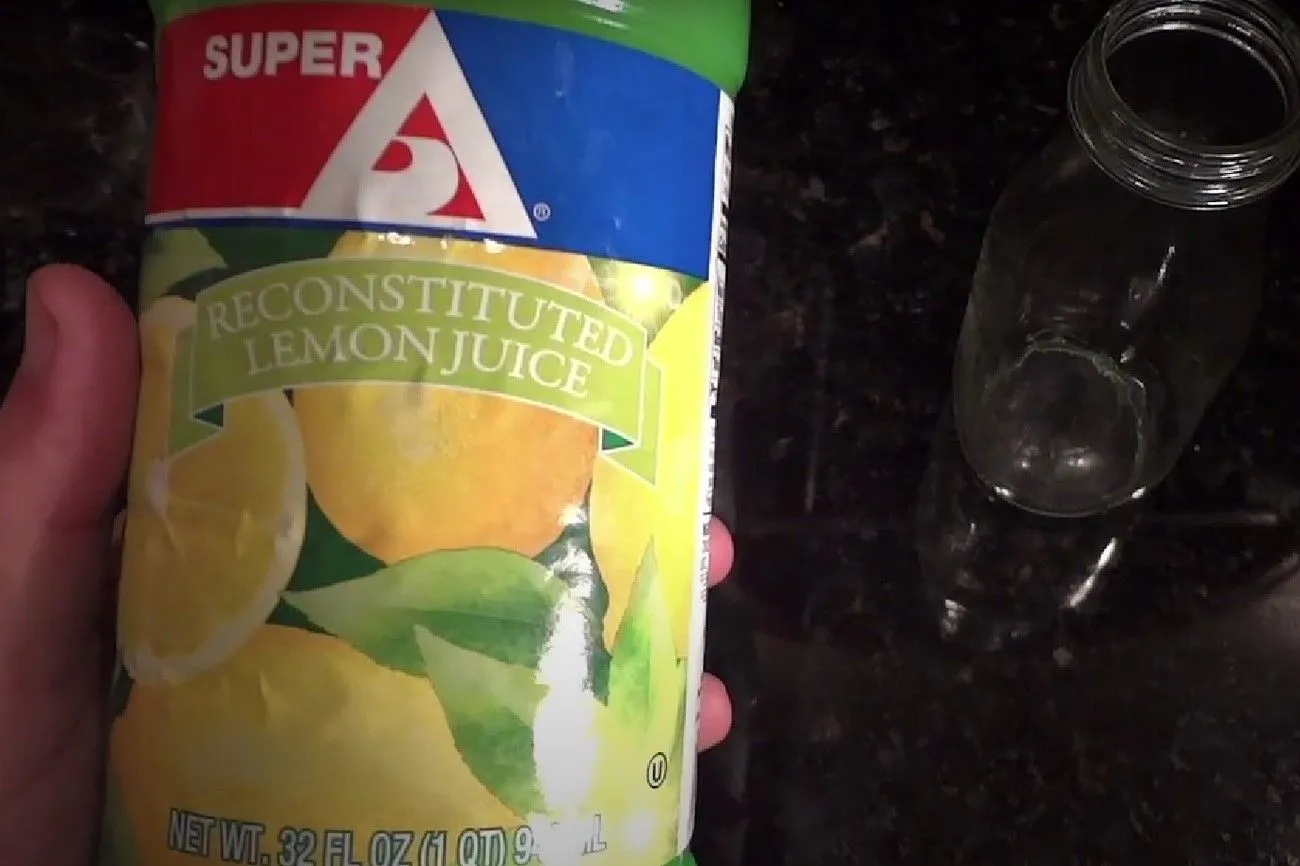
Rusted Knives
To maintain the durability of your knives and avoid the need for costly replacements, it's crucial to adopt proper care practices, particularly when rust begins to develop on stainless steel blades. Instead of resorting to buying new knives, there is an effective solution to tackle this issue. Start by submerging the affected knives in lemon juice and let them soak overnight. The natural citric acid in lemon juice aids in breaking down and eliminating rust. Following the soaking process, wipe the knives thoroughly with a slightly damp sponge, ensuring all rust and lemon juice residue is removed. By following this straightforward method, your knives should be restored to their original condition, allowing you to continue using them without any inconvenience.
 @Will It Rust? Reconstituted Lemon Juice (Forced Patina)/Sharp Works/YouTube.com
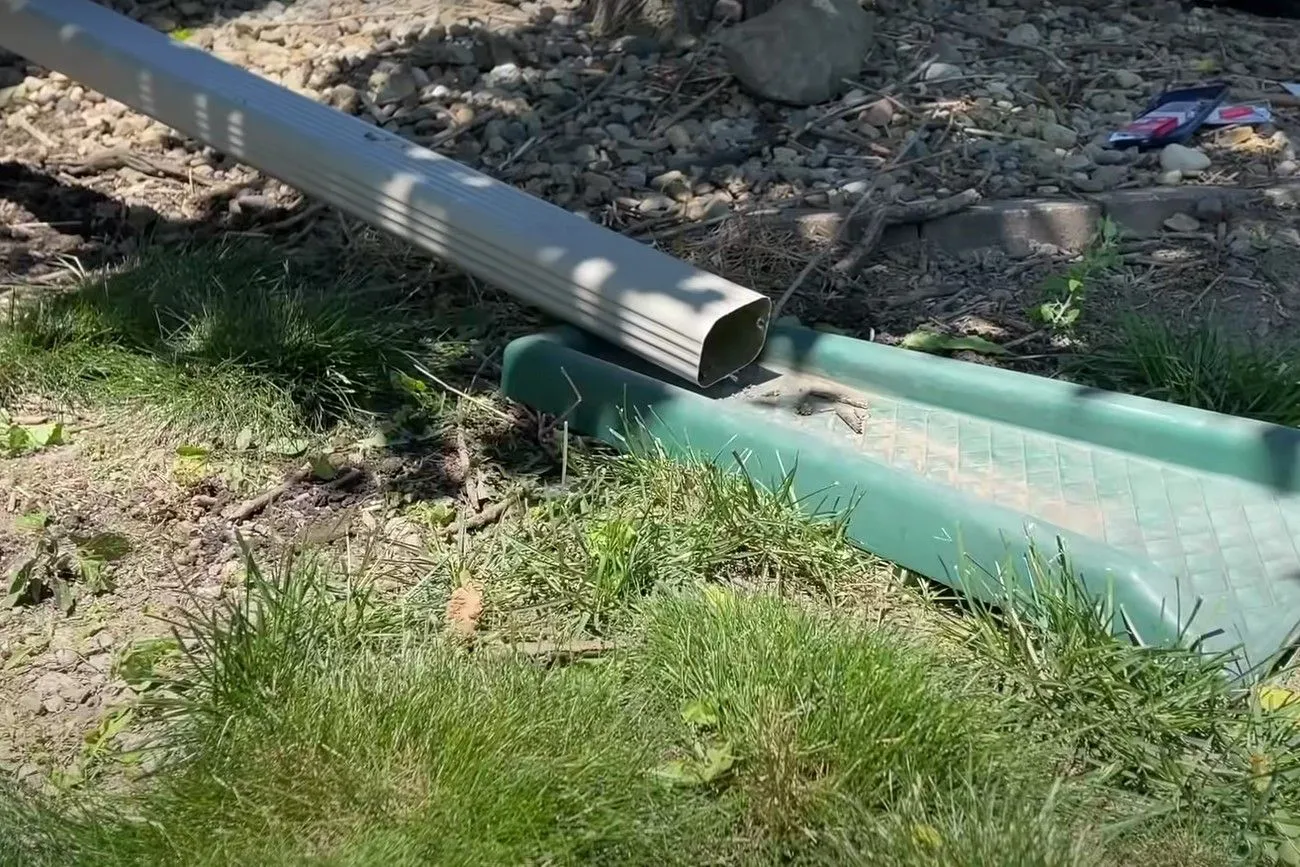
Drain Extenders for Gutters
Following a period of intense rainfall, it is not uncommon for individuals to discover flooding in their basements. However, addressing this problem is not as daunting as it may initially appear. The solution lies in the installation of a downspout extender. By incorporating a downspout extender into your gutter system, the rainwater that accumulates will be directed farther away from your house and basement, significantly reducing the risk of flooding. The beauty of downspout extenders is that they offer ample room for creativity, allowing you to choose from various designs and styles that complement your aesthetic preferences.
 @3 Options for Extending Your Downspouts/Everyday Home Repairs/DIY with Michael Borders/YouTube.com
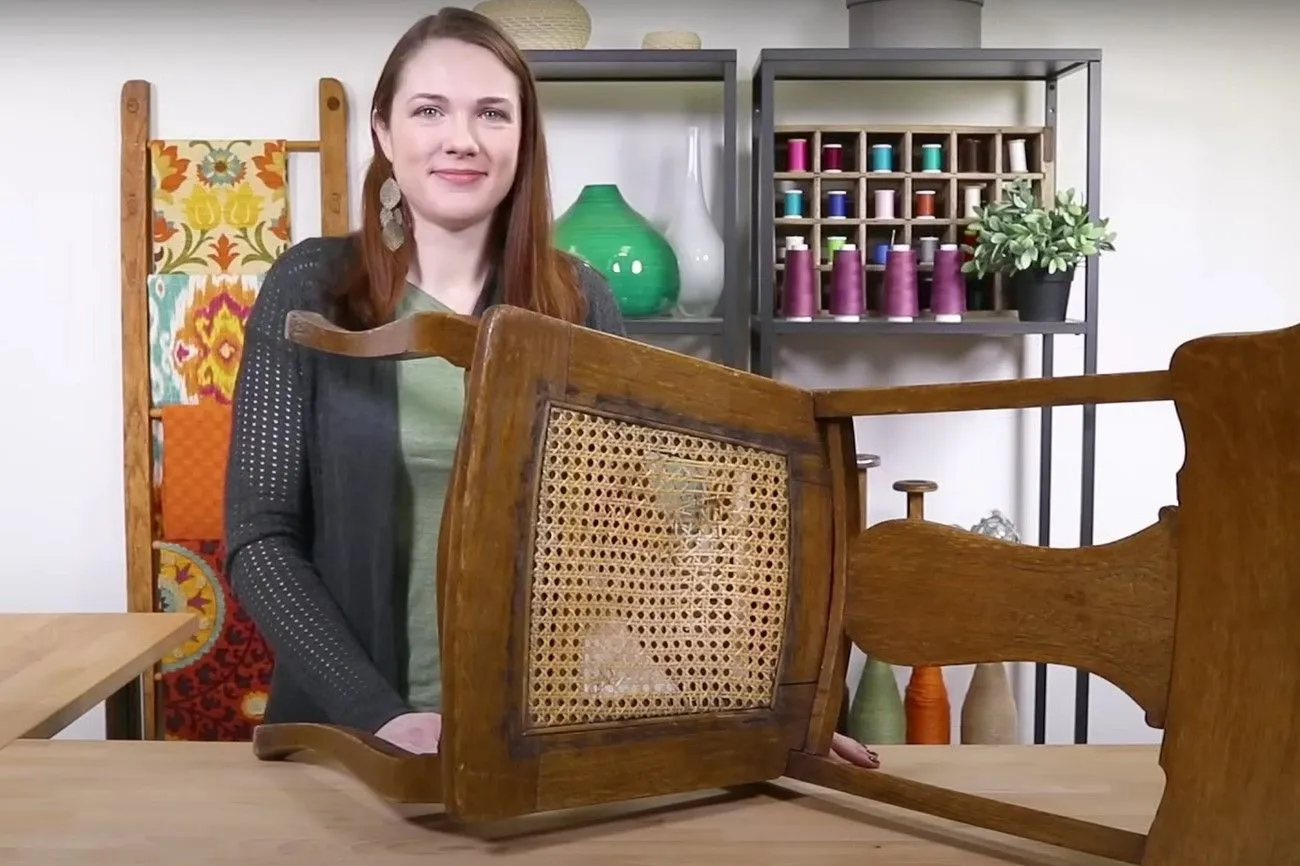
Sagging Canning
If you have chairs featuring wicker designs, you might notice that their seats start to sag over time, particularly with regular use. However, you can revive these chairs and restore their original shape with some simple care. To tighten the caning, you'll need a wet sponge dampened with warm water. Gently wet the underside of the chair's seat using the sponge. Allow it to dry overnight, and if necessary, repeat the process. This method helps the caning regain its tautness, bringing your chairs back to life.
 @How to Replace Pressed Cane Webbing/OnlineFabricStore/YouTube.com
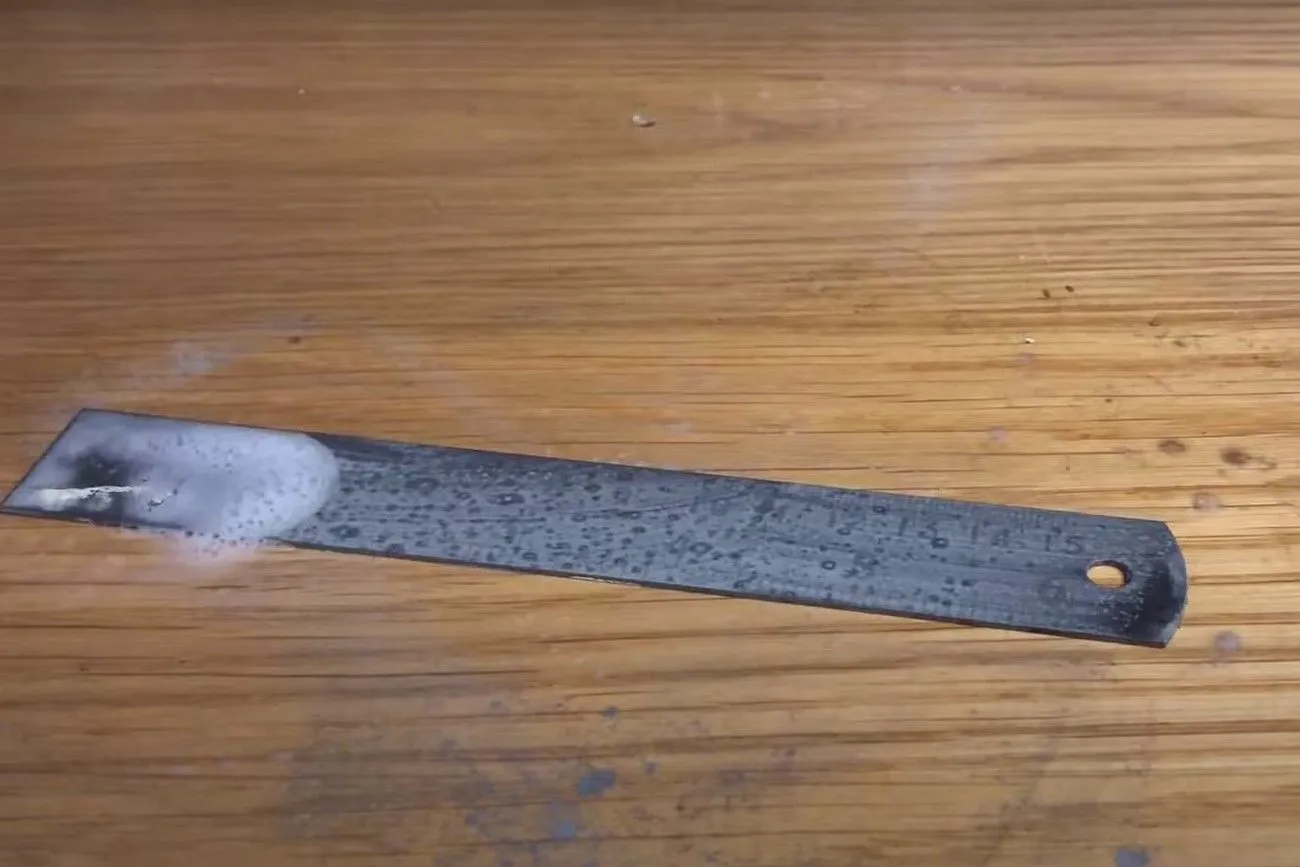
Cleaning a Ruler
Like any other tools, metal implements such as rulers can become dirty and rusty over time. However, it's essential to maintain the legibility of the measurement markings for accurate DIY projects. To address this, begin by applying a layer of liquid paper or correction fluid over the engraved measurement areas. Allow it to dry completely. Next, take a fine grit abrasive sandpaper and gently remove the dried liquid paper, revealing the clean and readable markings on the ruler. This simple technique can help restore the clarity of the measurements and ensure the ruler remains functional for your DIY endeavors.
 @Restore Steel Engineering Rule - 3 Stage Cleaning Process/Home Sprout/YouTube.com
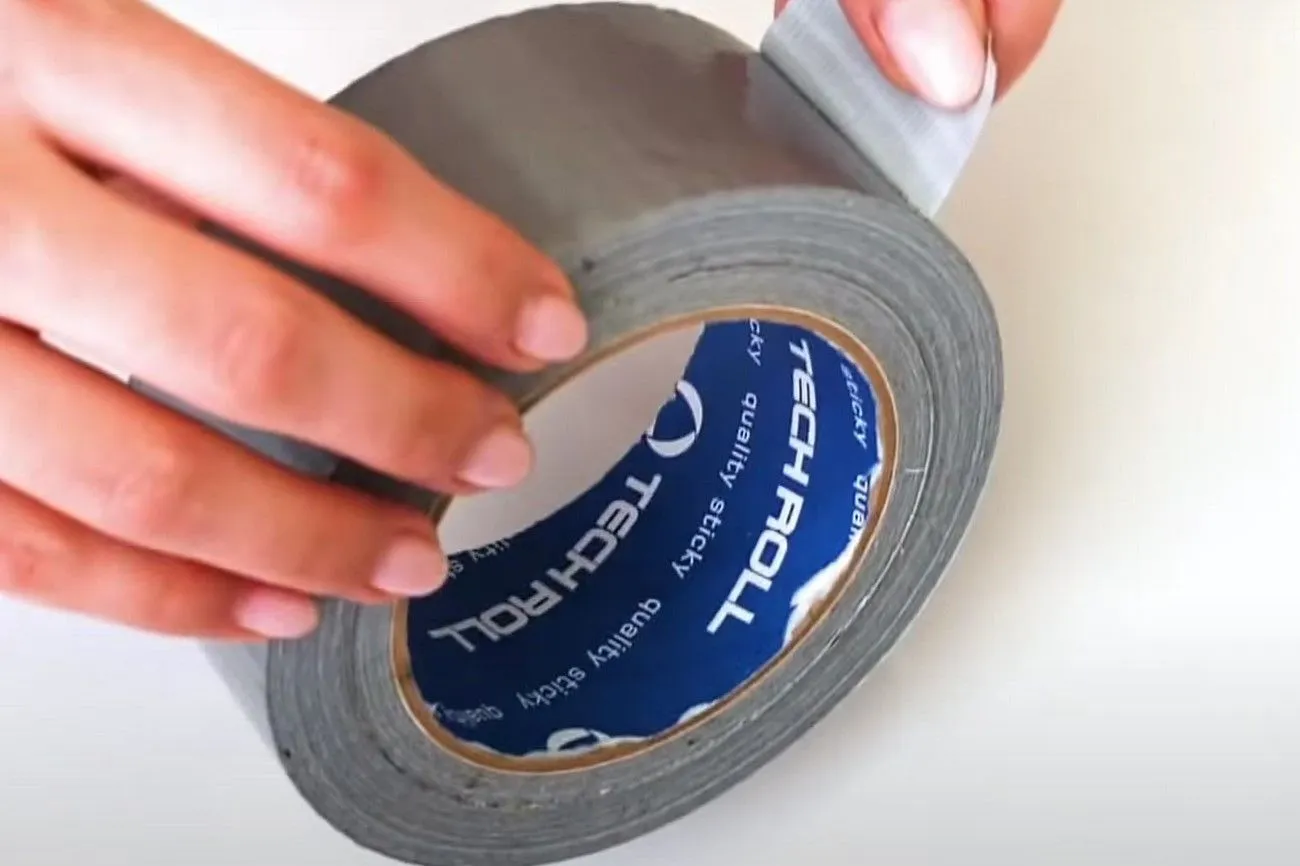
Stuck Light Bulb
When light bulbs become stuck in their sockets, it can be frustrating to remove them. However, there are various methods you can try to safely extract the bulb. One approach involves utilizing duct tape, which is a versatile tool. Begin by cutting a one-foot-long piece of duct tape and pressing it onto the center of the bulb. Fold each end of the tape in half, sticking it to itself. Then, firmly grasp each side of the tape and twist it counterclockwise to loosen the stuck bulb from the socket. This technique provides a good grip and leverage to help safely remove the stubborn bulb. Remember to exercise caution and ensure the power is turned off before attempting any bulb removal.
 @25 HACKS WITH SCOTCH TAPES/5-Minute Crafts FAMILY/YouTube.com
Smelling Good
Maintaining a fresh and pleasant scent in your home can sometimes be a challenge, even with regular cleaning. However, there are simple ways to enhance the air quality and create a desirable aroma. One popular method suggested by handymen is to use extracts or essential oils of your preferred scents. You can achieve this by placing a few drops of your chosen extract or essential oil onto your air filter. As the air circulates through the system, it will carry the fragrance and disperse it throughout your home, leaving a refreshing and pleasant scent in the air. Remember to use oils and extracts that are safe for indoor use and to follow any guidelines provided by the manufacturer.
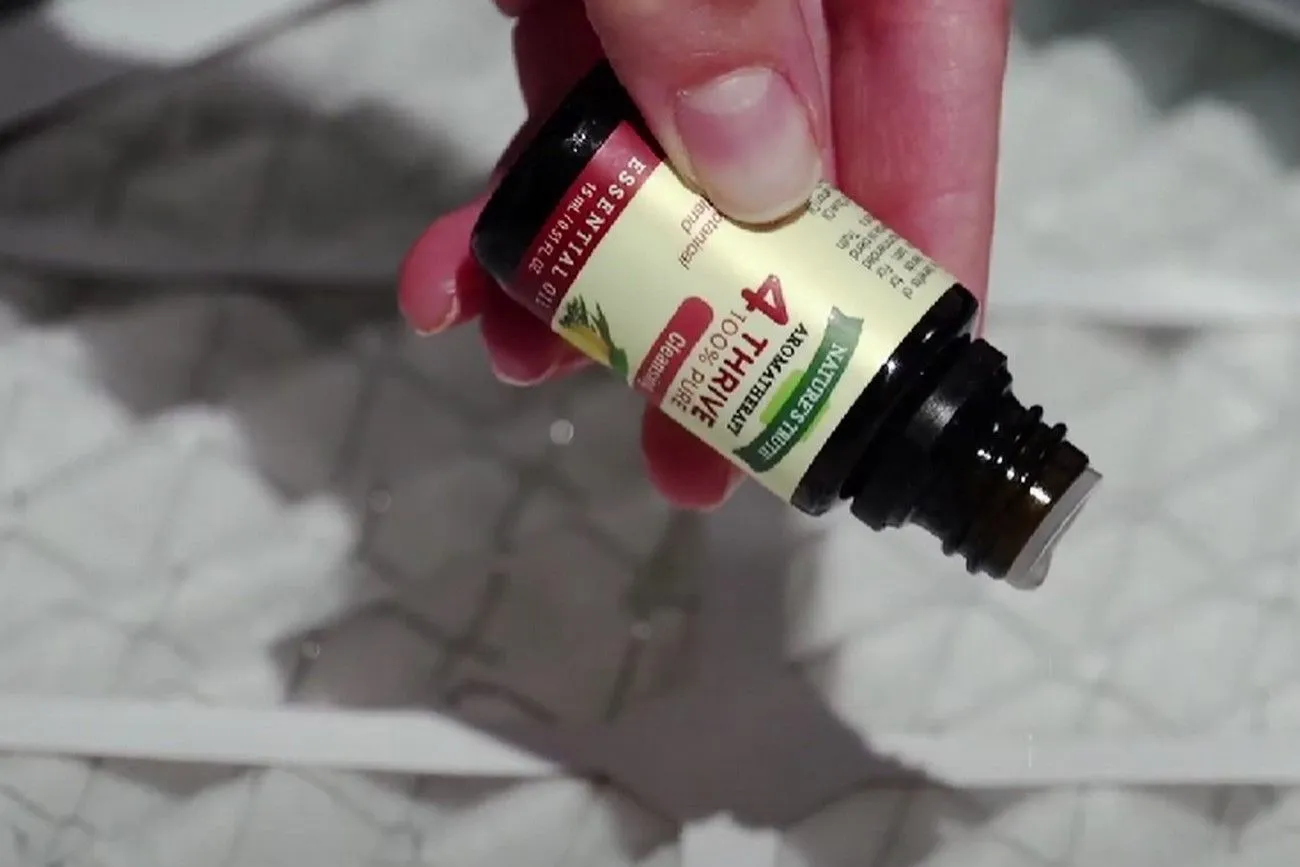 @Refresh Air Filter with Essential Oils/Nature's Truth Vitamins & Aromat/YouTube.com
Save Your Fingers
When working on DIY projects around the house, the hammer is an essential tool, but it can also pose a risk if not handled carefully, particularly to your fingers. However, there is a handy DIY hack that many use to protect their fingers while hammering. By using a clothespin, you can secure the nails in place and keep your fingers safely away from the hammering zone. Simply position the nail inside the opening of the clothespin and hold onto the clothespin's body while hammering. This technique provides a stable grip on the nail and reduces the chances of accidentally hitting your fingers with the hammer. Remember to exercise caution and focus on maintaining control while using any tool.
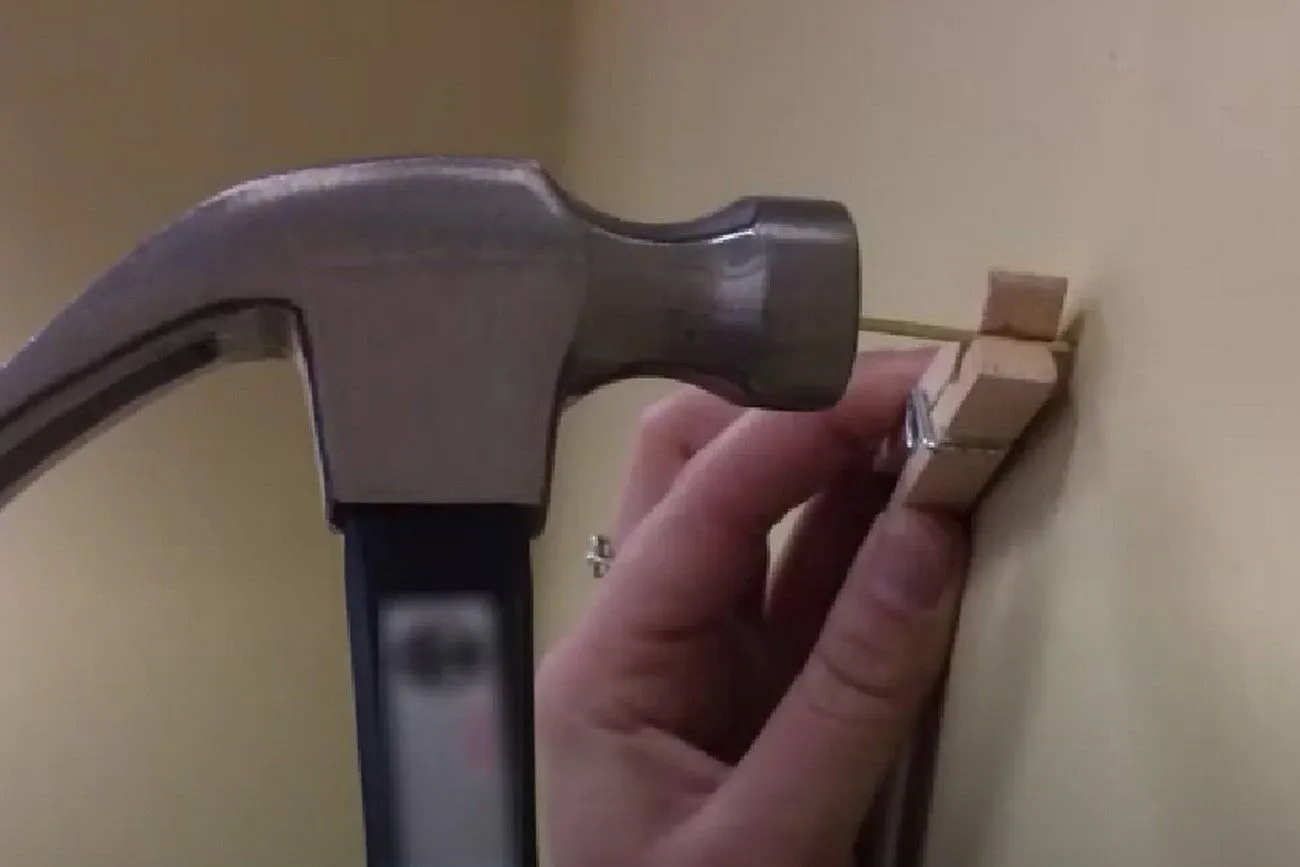 @How to Use a Clothespin to Hammer a Nail | Lennar's How to U/Lennar/YouTube.com
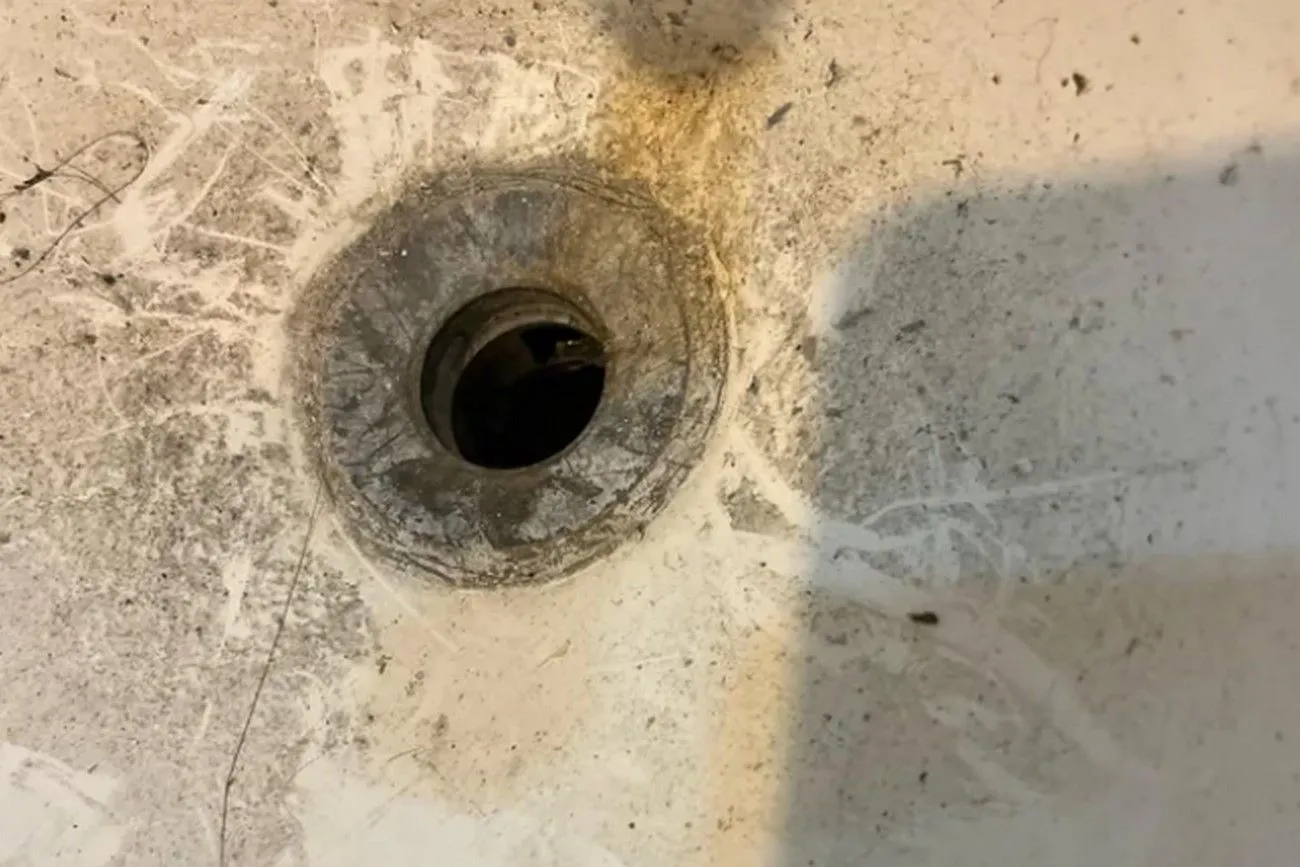
Clogged Drain
At some point, it's inevitable that your drain will become clogged due to hair or other debris accumulating in it. This can lead to backups in sinks or tubs. While there are chemical products available for unclogging drains, there's also a simple DIY method using a zip tie. Take a straight zip tie and insert it into the drain with the attachment piece facing down. Twist the zip tie and then carefully pull it out. This technique can effectively help unclog your drain and restore proper water flow.
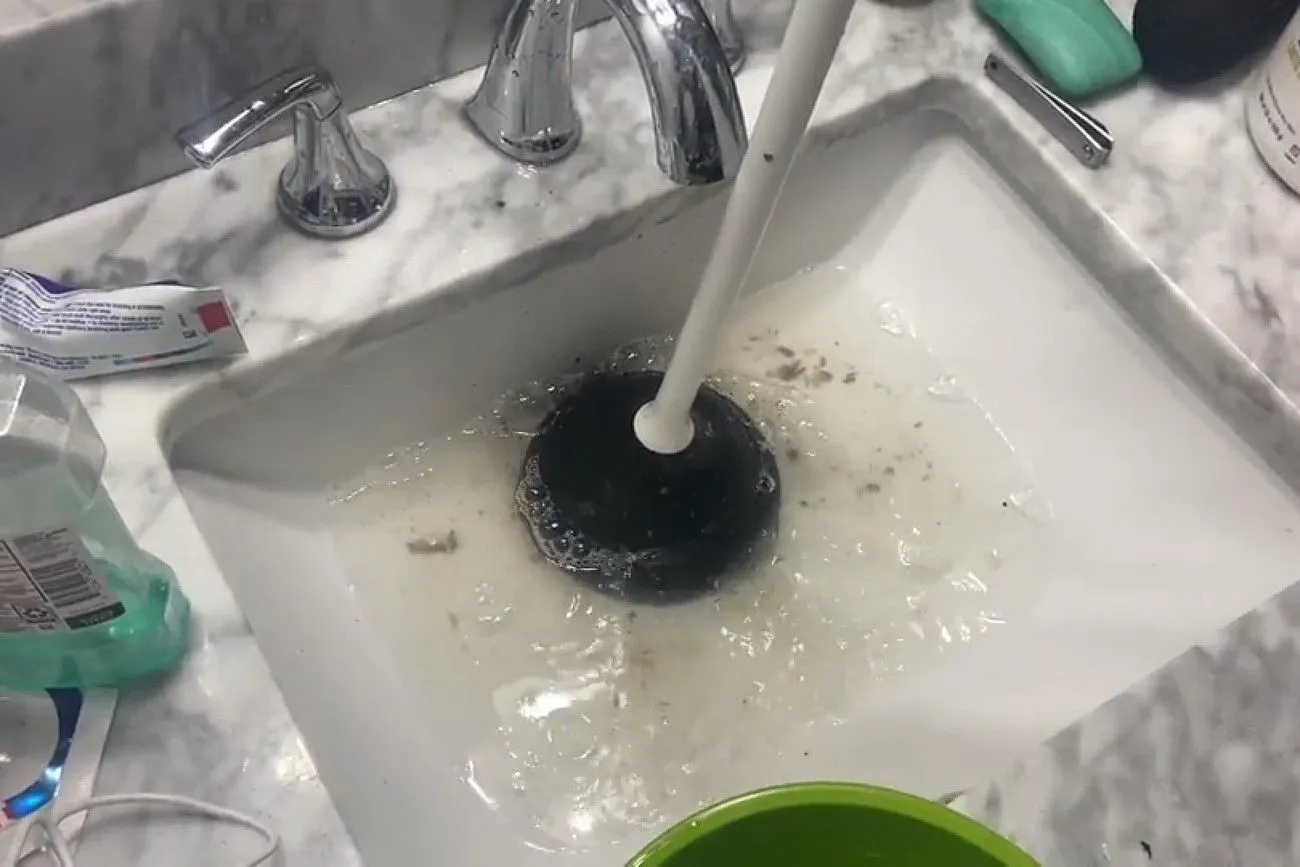 @Used-League-9286/reddit.com
Broken Lightbulb
If a lightbulb breaks while still in the socket, it can pose a risk of injury due to the broken glass. It's important to handle the situation with caution. To safely remove the broken bulb, you can use a potato from your kitchen pantry. Begin by baking the potato until it is cooked. Once baked, cut the potato in half and press the flesh side onto the broken glass. With a gentle counterclockwise twisting motion, you should be able to unscrew and remove the remaining portion of the lightbulb without risking injury. Remember to handle the broken bulb and potato carefully and dispose of them properly.
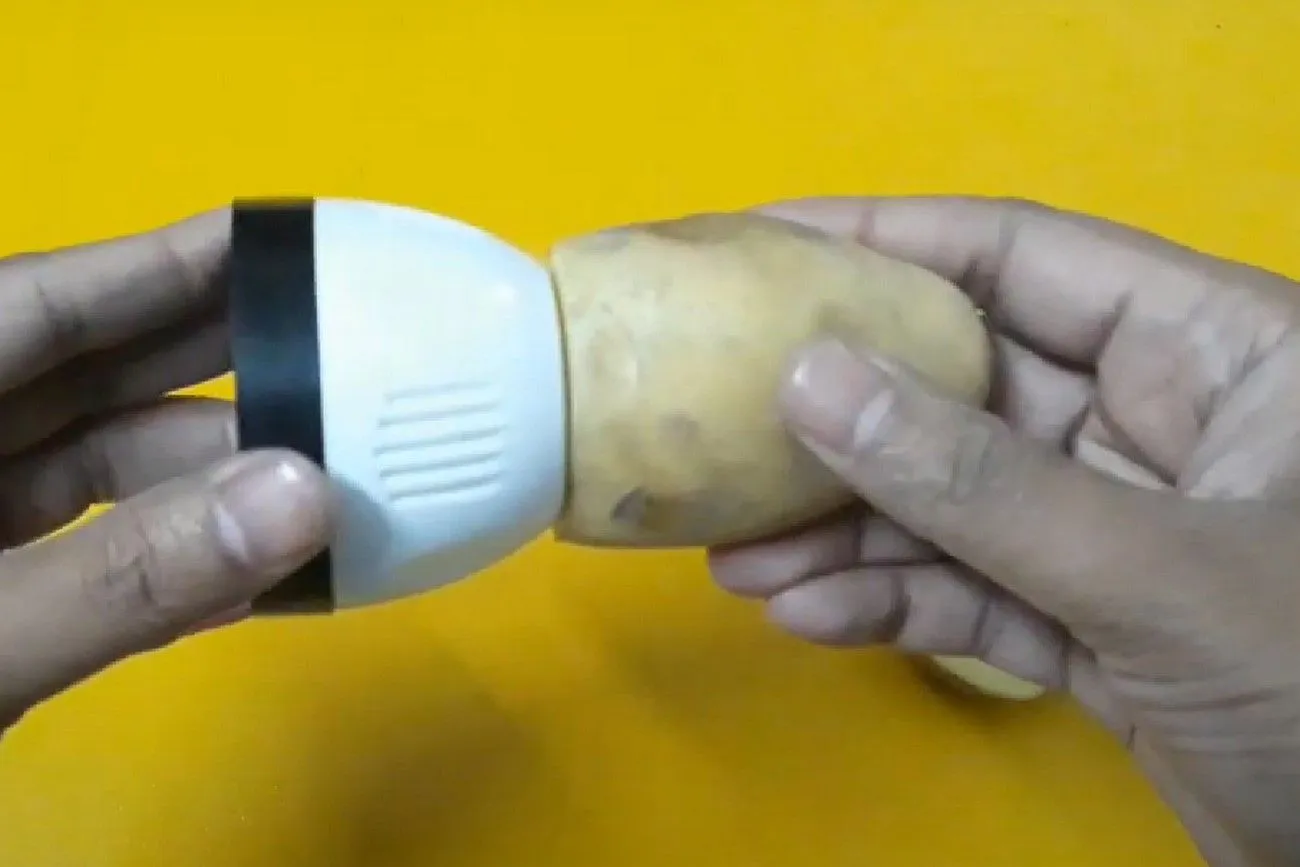 @How to remove broken light bulb from socket with a potato/Md. Mridul Kabiraz/YouTube.com
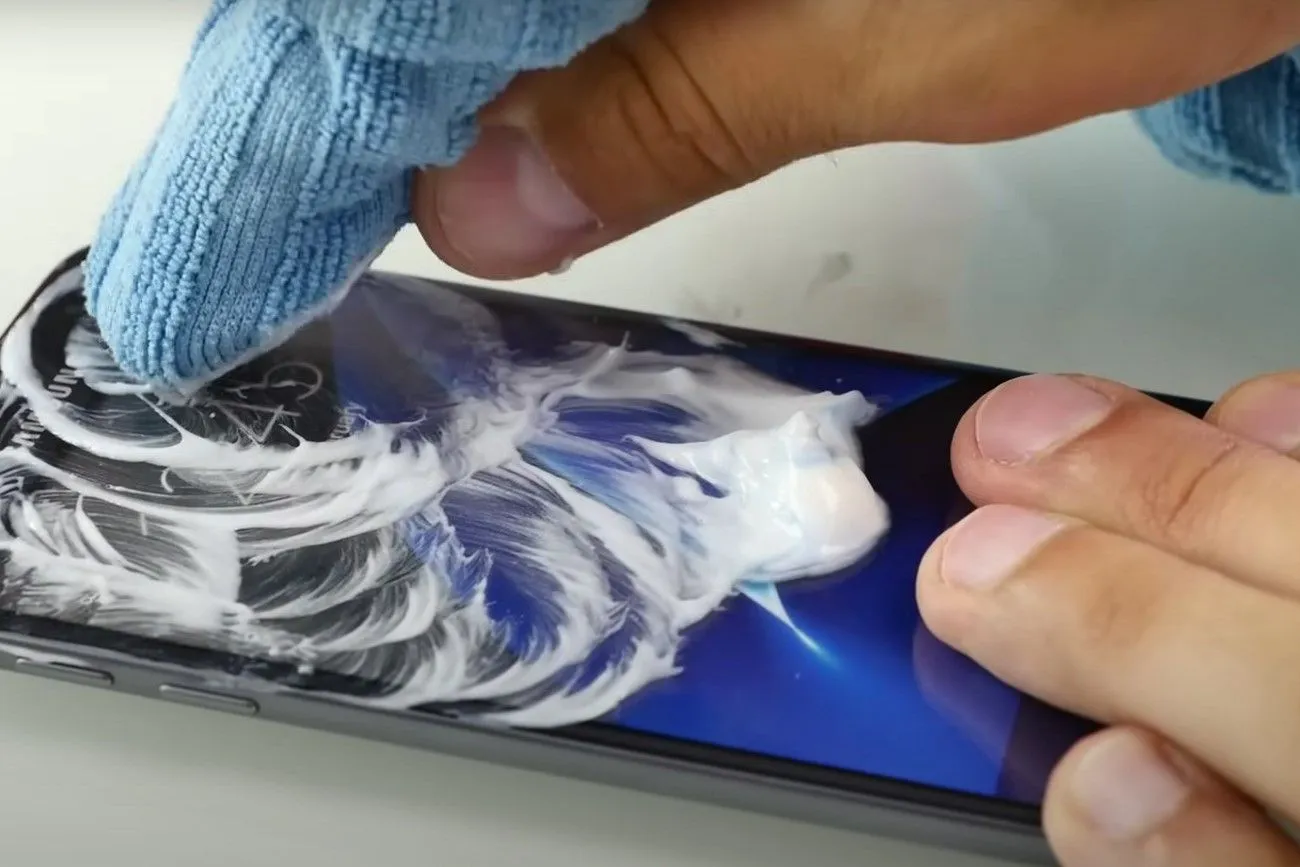
Toothpaste as Scratch Remover
It turns out that toothpaste is actually multifunctional! Not only is it great for keeping our teeth healthy and clean, but it can also be used to buff out small scratches. Whether it's the screen of your phone, a glass surface, or even your car, this method will be effective! Toothpaste has a minor grit to it, meaning that it is able to buff out surface-level scratches. To effectively buff out a paint scratch on your car, apply toothpaste onto a dry and clean rag, and gently rub it in using circular motions.
 @Remove Scratches from your Smartphone Screen with TOOTHPASTE !/TechMagnet/YouTube.com
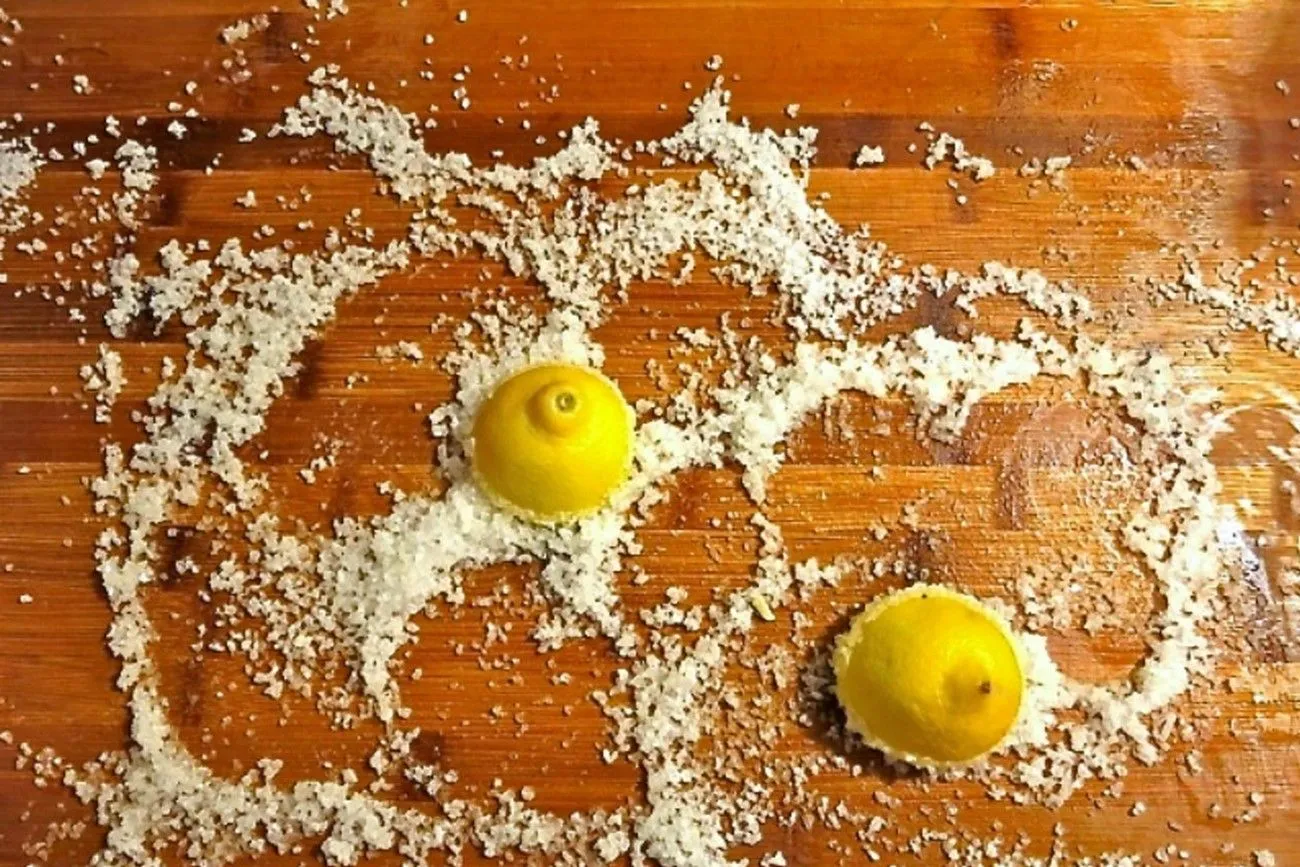
Cleaning Wooden Cutting Boards
Surprisingly, you may have been cleaning your wooden cutting board incorrectly all this while. With numerous tiny crevices on wooden cutting boards, it's inevitable for bacteria and food particles to accumulate in unexpected places. However, there's a simple solution to prevent the need for frequent board replacements. To eliminate stains and persistent odors, try this clever hack: Sprinkle coarse salt all over the board and use half a lemon to vigorously rub it in. The coarse salt effectively reaches every nook and cranny, while the lemon serves as a natural disinfectant. This method ensures thorough cleaning and revitalizes your wooden cutting board.
 @How to Clean a Wooden Cutting Board with Lemon and Salt/Life is Made with Katie Miles/YouTube.com
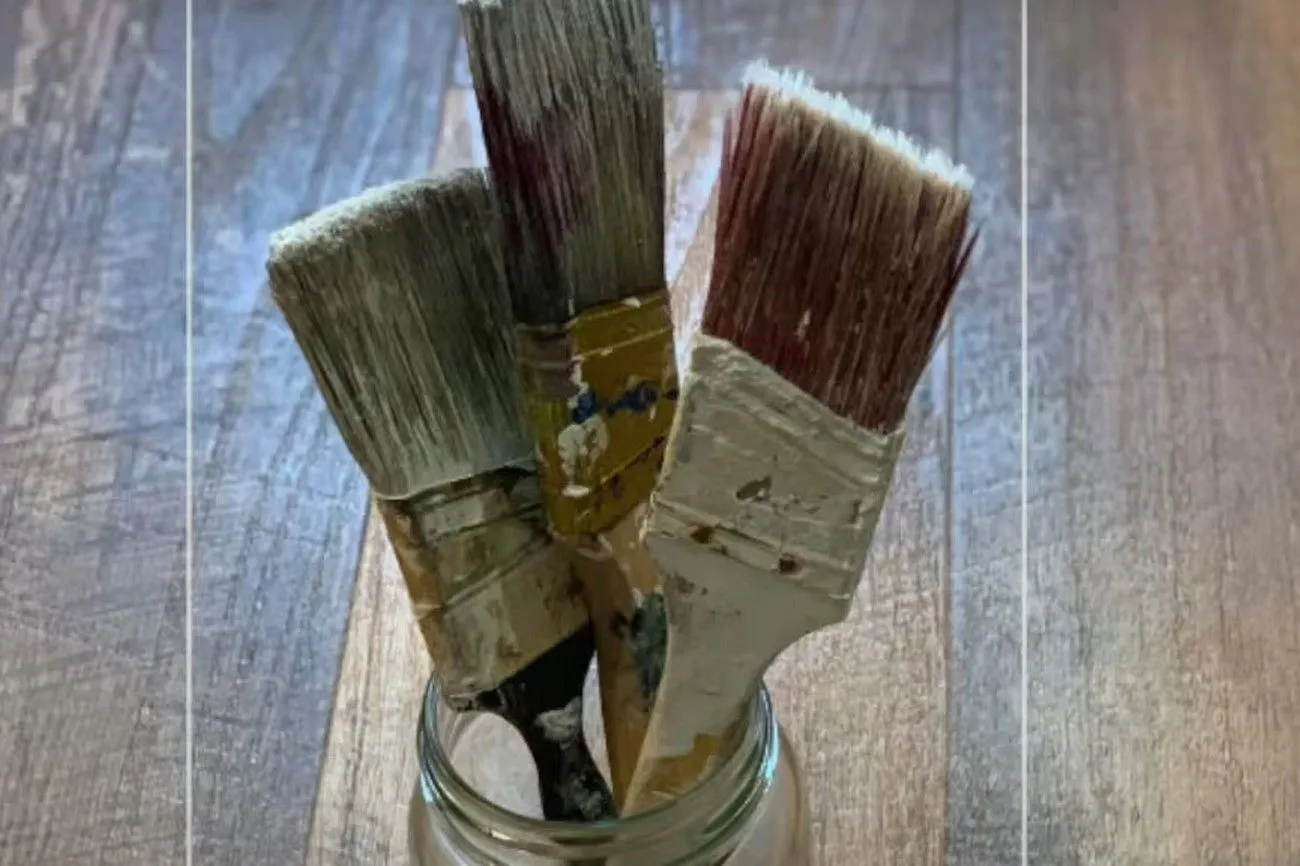
Refreshing Paint Brushes
For DIY enthusiasts who frequently engage in painting projects, the need for new paintbrushes often arises due to the accumulation of dried paint on the bristles. However, there's a simple solution to rejuvenate these brushes. By using warm water and soap, you can effectively remove the dried paint residue. Wet the paintbrushes with the mixture and gently scrub back and forth until all the paint has been successfully eliminated, restoring the brushes to their original condition.
 @How to Soften Hard Paintbrushes with Vinegar/Average But Inspired/YouTube.com
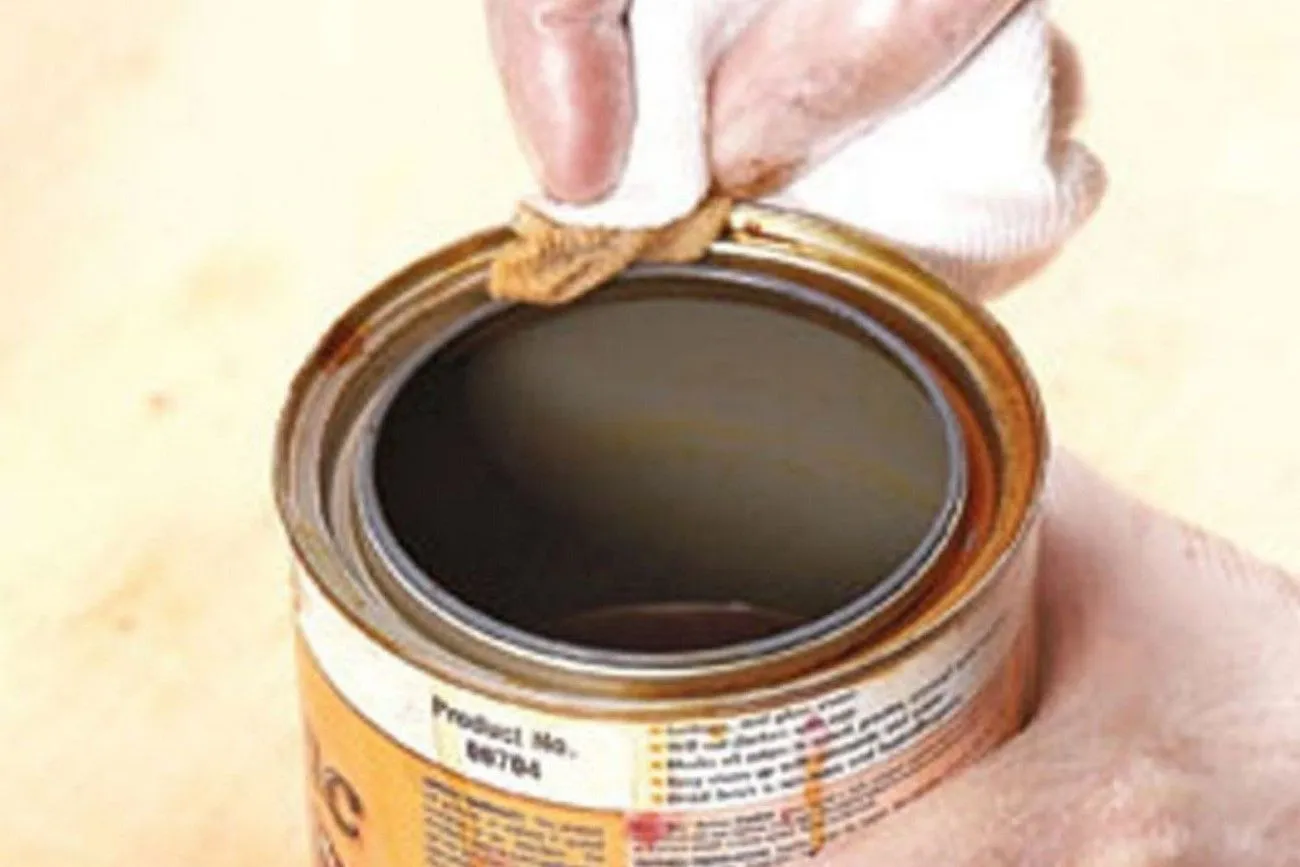
Preserving Tinned Products
To maintain the freshness and usability of varnishes or other finishes, it's important to ensure that their lids can be properly sealed. Over time, build-up around the rim can hinder the effectiveness of the seal, leading to quicker product degradation. However, you can easily prevent this by taking a cotton cloth and wiping the rims clean before closing the lids or after using the product. This simple practice helps remove any residue or debris that could compromise the seal, keeping your varnishes and finishes in optimal condition for future use.
 @Quick Tip : How To Keep Your Paint Can Rims Clean/TheMuskokaPainter/YouTube.com
A DIY Drain Unblocker
Start by pouring about three cups of baking soda down the drain. Subsequently, apply vinegar to initiate a chemical reaction that aids in breaking down the clog. Allow the mixture to sit in the drain for approximately 30 minutes. During this time, the baking soda and vinegar will work together to dissolve the clog. Once the 30 minutes have passed, pour boiling water down the drain to flush out any remaining debris. The hot water will help dislodge and wash away the dissolved clog, leaving your drain clear and free-flowing.
 @How to unclog a kitchen sink using baking soda and vinegar !!/Pan The Organizer/YouTube.com
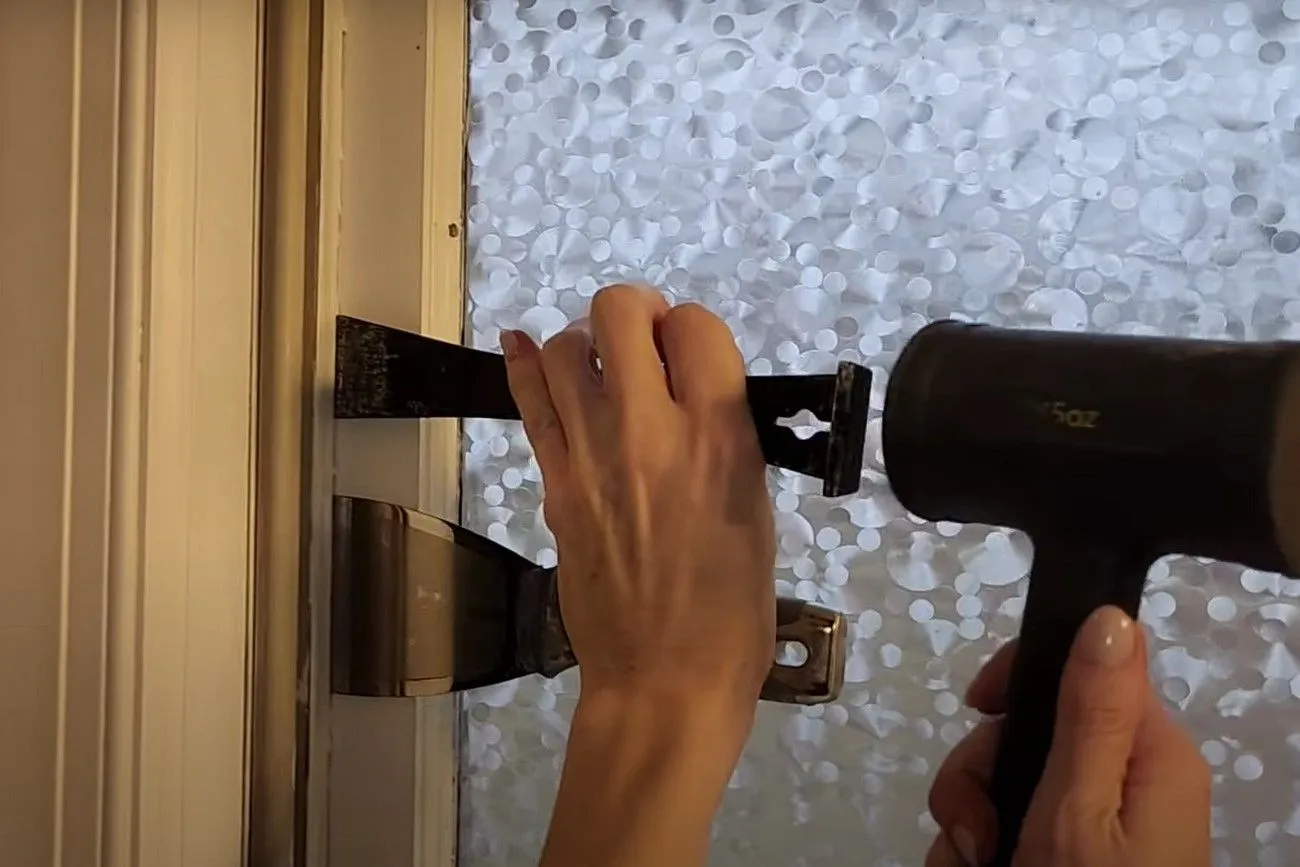
Reopening Sealed Windows
Have you ever encountered the frustration of moving into an older apartment or house, only to find that the "newly painted" windows are actually stuck shut? This commonly occurs when the paint hasn't been given enough time to fully dry, resulting in the window being sealed to the frame. However, there's a DIY solution that requires a bit of patience and a gentle touch. Using a chisel and a hammer, carefully position the chisel between the window and the frame where they are stuck together. By lightly tapping the chisel with the hammer, you can remove the paint that is causing the window to be sealed shut.
 @NEW! How to OPEN a PAINTED SHUT WINDOW: step-by-step instructions/Adrienne Loves Old Houses/YouTube.com
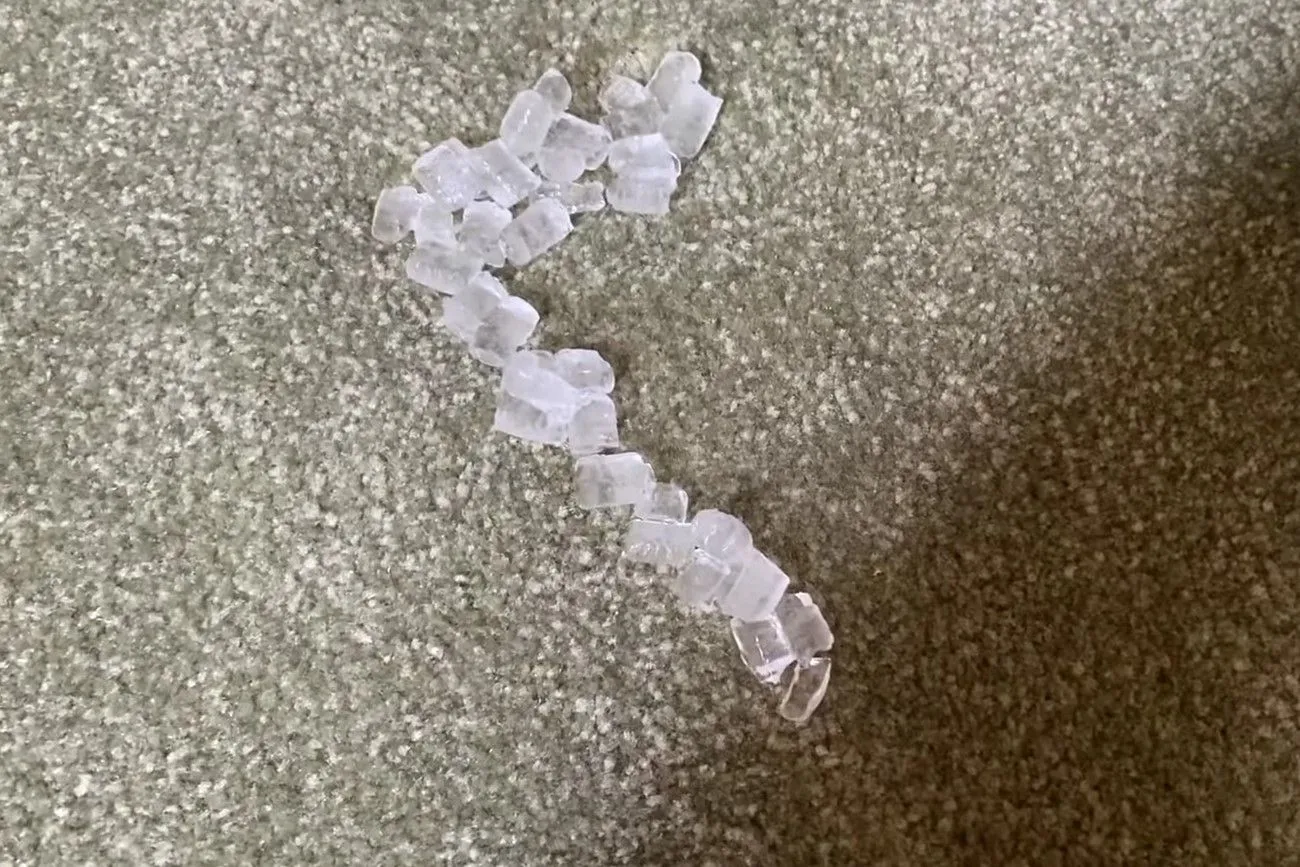
Taking Out Carpet Dents
Placing ice cubes on the dented areas of the carpet and allowing them to sit for a few hours or overnight will effectively remove the dents. As the ice melts, the water is absorbed by the carpet fibers, restoring them to their original form.
 @Get indents/dents out of carpet - ICE method/DIY with Michael Borders/YouTube.com
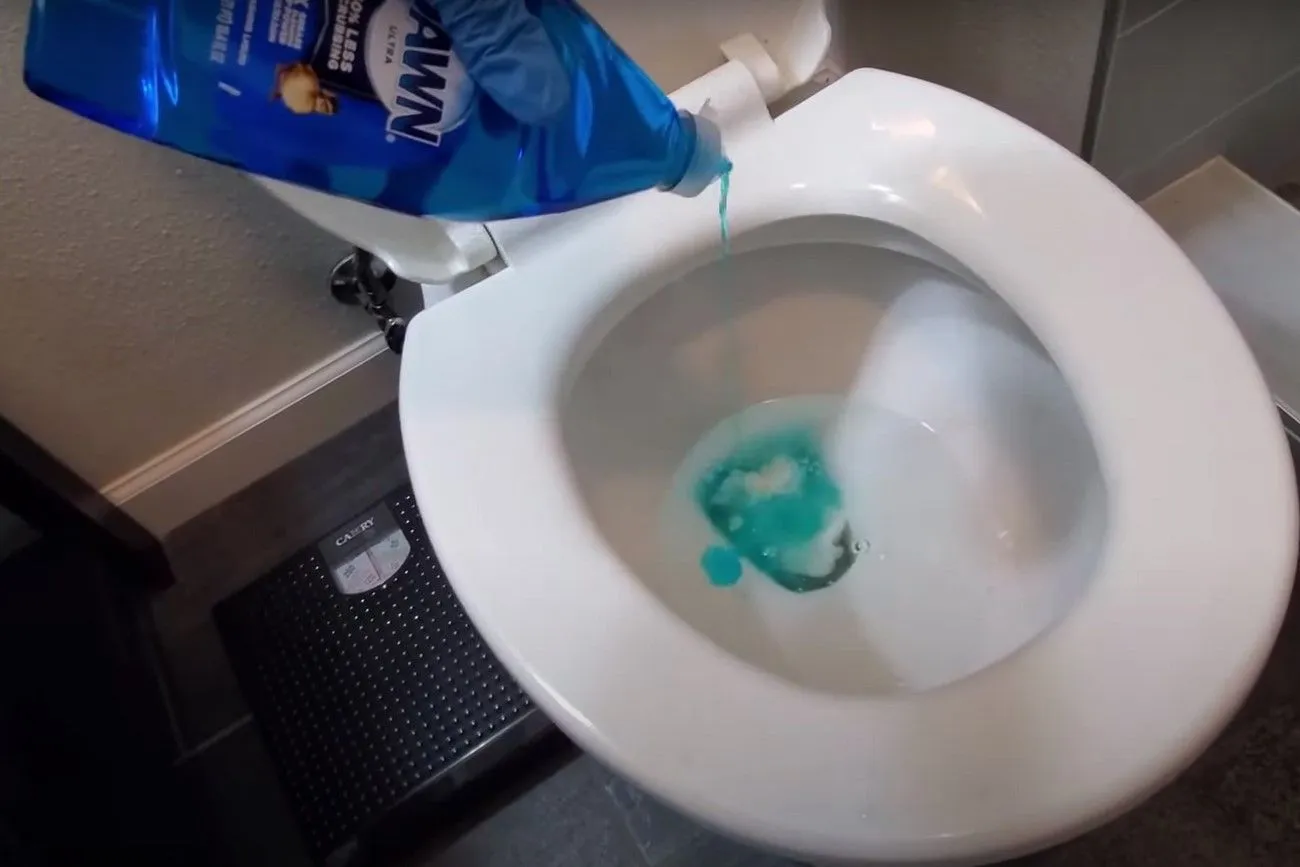
Using Dish Soap in the Toilet
In addition to its effectiveness in cleaning dishes, dish soap also serves as a remarkable degreaser, making it an excellent solution for unclogging drains. Numerous individuals have found that pouring dish soap into a toilet can effectively loosen blockages. To utilize dish soap for unclogging a toilet, pour one cup of your preferred dish soap brand directly into the bowl. Allow the soap to sit in the bowl for approximately 15 minutes. Afterward, pour a bucket of hot water from waist height into the toilet bowl to help clear the clog.
 @How to Unclog Toilet without a Plunger!/JMG ENTERPR/YouTube.com
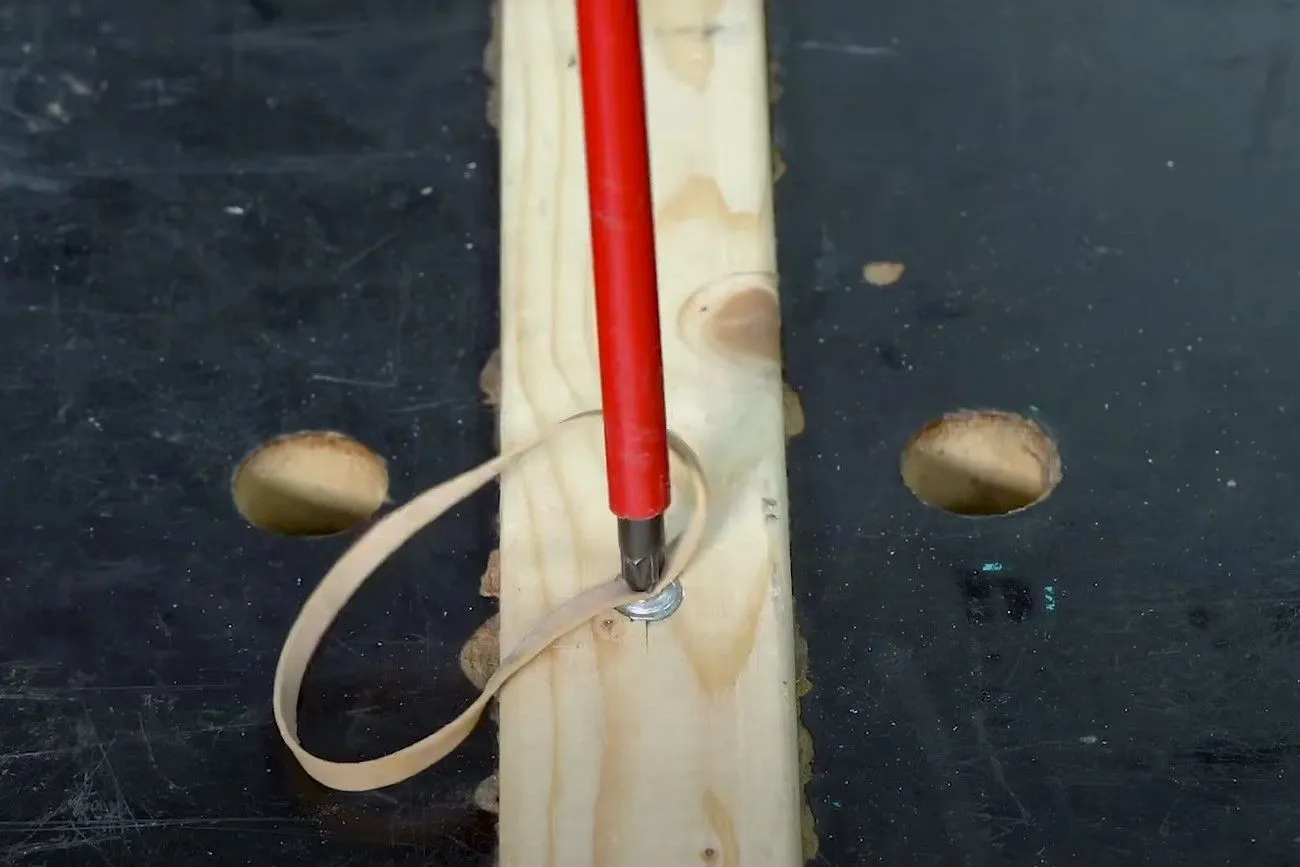
Using Elastic Bands and Screws
By placing an elastic band on the screw's surface, you can enhance the force and grip of the screwdriver. The rubber from the band will provide additional traction, eventually loosening the screw from its position. This technique is particularly effective for worn-down screws as well.
 @How to Remove a Stripped Screw Using a Elastic Band/City & Guilds Electrical/YouTube.com